
Curved displays just like the Acer Predator Z35p and AOC AG352UCG are all effectively and good for making you are feeling extra immersed in a recreation, what with these ultrawide edges supposedly wrapping themselves nearer spherical your eyeballs like some sort of pixelated caress in your peripheral imaginative and prescient, however let’s face it. Curved displays are hideously costly and any bend they do possess is commonly so tiny that you just’d be forgiven for considering you’ve truly purchased a flat display screen by mistake.
No, the one strategy to get really suckered right into a recreation is to go multi-monitor. I’m not speaking two displays, both. I’m speaking about making a THREE-sided boxed-in bezel palace that shuts off all notion of the skin world. Here, there are solely video games stretching, fairly actually, so far as the attention can see. And I’m going to inform you set all of it up in 5 simple steps.
Step One: Don’t try to match three 27in displays on a desk that may barely maintain two of them with out one hanging dangerously off the sting.
Okay, the true Step One: The very first thing you must do is be sure to’ve received a graphics card with sufficient outputs on the again to help three displays. Doesn’t matter what mixture of ports you’ve received. As lengthy as you’ve received three or extra and your graphics card helps greater than two shows, you then’re good to go. My Nvidia GeForce GTX 1070Ti, for instance, has three DisplayPorts, one HDMI and one DVI-D, and for the needs of this experiment I used two DP and one HDMI.
Step Two: Buy/scrounge/cobble collectively three displays and join them as much as your PC. It doesn’t matter in the event that they’re all the identical display screen or a unique make – you simply want three of them. If you want some assist deciding what display screen to purchase, then have a gander at our best monitor checklist and shopping for information.
Step Three: Once you’ve acquired and organized your shows, ideally not hanging off the sting of your desk, then it’s time for the enjoyable bit – setting them up. If you’re operating Windows 7 or Windows 8, good click on wherever in your desktop and choose Screen Resolution. Windows 10 customers, alternatively, might want to proper click on and select Display Settings. Once there, you’ll want to rearrange every monitor appropriately. Click Identify and a giant quantity will pop up on every display screen.
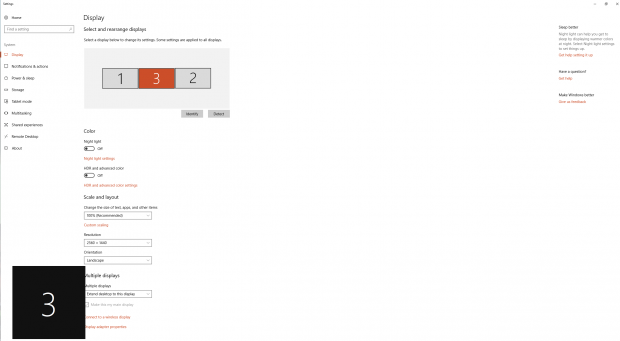
Click to increase…
Make certain they match the order that’s proven within the Display Settings menu and drag and drop them into place if not. Windows 10 will save any modifications mechanically, however Windows 7 and eight peeps might want to click on Apply for something to take impact.
Next, you’ll need to choose ‘Extend these displays’ within the Multiple Displays possibility. I’d additionally advocate making your central display screen your predominant show, as that is the place your shortcuts will likely be positioned. You can, in fact, make a unique one your predominant show if you happen to want.
Step Four: So now we’re all arrange for utilizing three displays for on a regular basis use, it’s time to configure them for gaming. This is finished via your Nvidia or AMD management panel.
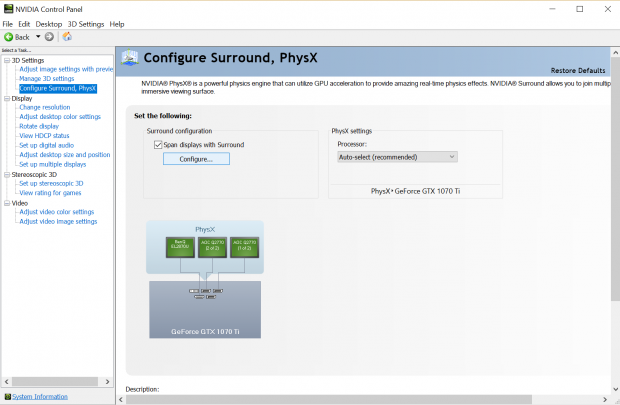
For Nvidia graphics playing cards, you must allow Surround. To do that, discover the 3D Settings possibility on the left hand menu and choose ‘Configure Surround, PhysX’. Tick the field that claims ‘Span displays with Surround’ and hit Configure. You’ll in all probability want to shut some packages earlier than you accomplish that, however as soon as that’s completed you’ll be taken to the Surround Setup display screen.

Click to increase
A bit just like the Windows show settings, you’ll want to ensure the displays are all within the right order. Select 1×Three within the Topology field, after which tick the containers within the Display menu beneath to match the numbers being displayed onscreen. Check the decision’s as excessive as it will probably go within the Resolution field, and ensure your refresh fee is ready to 60Hz (or greater if all three of your displays help greater refresh charges). Then click on Apply.
For AMD house owners, you’ll have to allow Eyefinity. Open up AMD Radeon Settings and click on the Eyefinity tab alongside the highest menu.
Now, Quick Setup is okay in case your displays all have the identical decision, however you’ll want to make use of the Advanced Setup in case your displays are totally different. In my case, I had two 2560×1440 displays and one 3840×2160 one and Quick Setup doesn’t take note of 4K scaling, so I had a large black bar throughout my 4K display screen from 2560 pixels down. For what it’s value, Nvidia’s Surround software program simply will get on with it and handles all of it mechanically, negating the necessity for the faff that’s about to ensue.
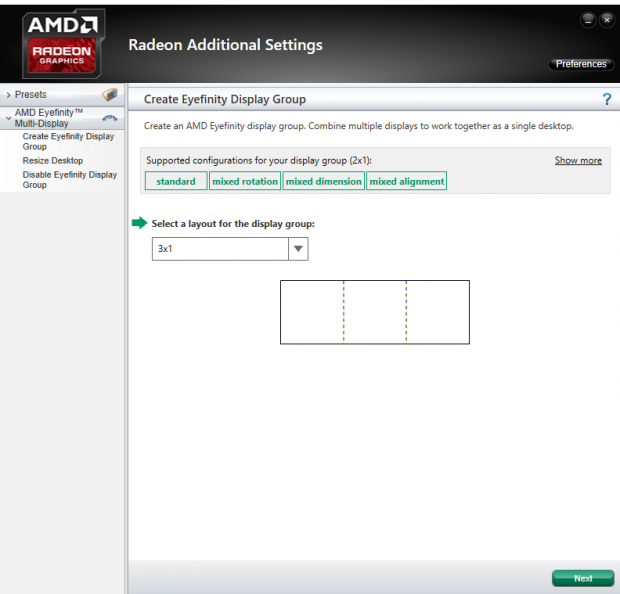
In Advanced Setup, choose 3×1 within the structure possibility and hit Next. Then it’ll ask you what orientation you’d like, however except you need to throw any vertical displays into the combination, simply hit Next. Now it’s association time. Here, you’ll have to click on Start Arrangement and choose which field corresponds to the situation of the monitor that’s at the moment highlighted in blue. Hit subsequent.
Now you’ve received to align them, which is the fiddly half. The Align All software is kind of helpful, as this repositions all the pieces mechanically, however you’ll be able to faff round with it manually if you happen to actually need to. Those with totally different monitor resolutions must ignore the numbers, as they merely don’t match up. For sake of argument, I used the software to have my two smaller outer displays aligned in the course of the 4K one. Once that’s completed, you’ll have to resolve how your desktop’s going to be proven onscreen.
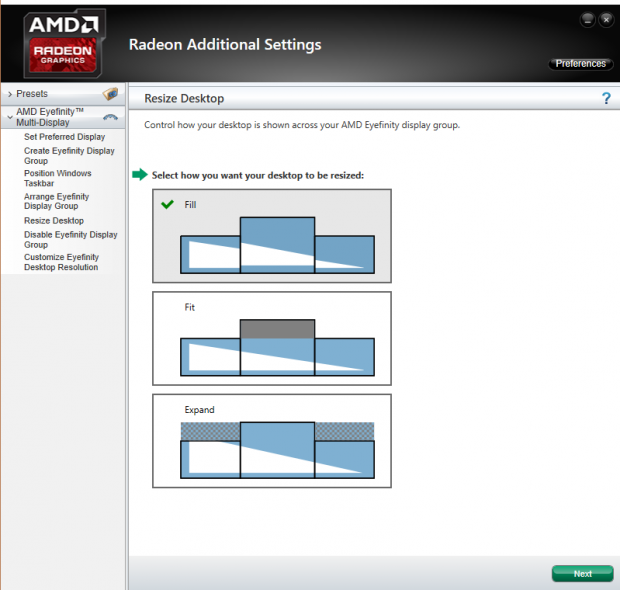
I picked the Fill possibility right here, because it was the one one which introduced my 4K monitor consistent with my two 1440p with out chopping something off. Yes, you free among the high and backside of the 4K monitor, however that’s the worth you pay for ultrawide gaming with totally different monitor resolutions.
Step Five: Once that’s all completed, congratulations! You’re prepared for some incredi-widescreen gaming, like taking part in Final Fantasy XII: The Zodiac Age in a facet ratio nobody ever requested for or actually wants.

Fancy taking part in Final Fantasy XII throughout three displays? Well, now you’ll be able to!
You’ll have to configure the decision for every recreation you play (not all video games help three-monitor setups, however the WSGF has a fairly in depth checklist of people who do), however in any other case you’re just about good to go. You may additionally need to fiddle with the sector of view setting if you happen to can, as low fields of view could make all the pieces really feel a bit too shut whereas greater ones may look too distorted.
It’s additionally value allowing for that some video games will nonetheless revert to a single 16:9 display screen throughout cutscenes and pre-rendered video, as these sections had been clearly by no means supposed to help this ridiculous sort of facet ratio.
You may additionally need to flip off Nvidia Surround or AMD Eyefinity for on a regular basis multi-monitor use as effectively, as maximizing any given window will see it hogging your complete three-screen setup quite than only a single monitor. Wallpapers and such can even stretch throughout all the show space with Surround and Eyefinity turned on, whereas you’ll get three separate desktop backgrounds after they’re disabled.
Otherwise, get pleasure from your new multi-monitor setup and comfortable gaming.


