Don’t get the hump – smash this mechanical camel’s puzzles.

The Legend of Zelda: Breath of the Wild Walkthrough – Main Quest: Divine Beast Vah Naboris Dungeon
After taking down Vah Naboris’ ft with bomb arrows, the time has come to truly board it. Riju gained’t include you – the Gerudo don’t want their chief to go dying, in spite of everything – and so Link as soon as once more finds himself alone on a Divine Beast.
In conventional Zelda phrases that is what we’d name a dungeon or a temple, however the Divine Beasts in Breath of the Wild are nonetheless decidedly completely different beasts – actually.
Your objective inside Vah Naboris is to seize the map, then after you have discover 5 completely different terminals scattered all through the beast. The dungeon structure is extra open than as is typical for Zelda, so the problem is as a substitute in lateral pondering. Vah Naboris options some electricity-driven puzzles, too, including an additional wrinkle.
Once you may have the map downloaded to your Sheikah Slate you’ll have the ability to make Vah Naboris’ transfer three completely different segments of its physique as you tumble about in what’s mainly its tummy. This will enable you in fixing puzzles – so let’s seize that map and get began.
Inside Vah Naboris: Getting the map
Head forwards from the doorway. Take out the guardian rapidly – it’s weak, so it’s not likely an issue. Head up the ramp. There’s Ganon’s corruption blocking your path – shoot the attention to the left to take it out.
Walk by means of the big room, which holds a clue as to the character of the puzzles right here – there are electrical circuits in every single place – after which head to the very again. At the again of the room on the far proper, towards the wall, there’s a ramp. Simply stroll on up and obtain the terminal.
You’ll see that for this beast the management is rotating the principle physique inside 90 levels. Good to know. You now have management. If you’ve achieved different dungeons you already know the drill right here: we now want to search out 5 terminals.

Inside Vah Naboris: Terminal 1
Walk out of the map room and stand on the ledge. Rotate the center part of the Naboris till you may see two chests, each on their sides, connected to the central platform. Now run down and stand on the foot of that central platform – the place you’ll be protected, to the aspect of the central column – and rotate the beast.
You’ll now be at a peak you couldn’t attain earlier than, however who says that’s sufficient? Walk forwards in the direction of the center, the place there’s one other protected wall, and rotate once more.
Now stroll out the brand new the ledge going through in the direction of the top of the divine beast. Rotate that entrance part twice. In entrance of you and to the left is your first terminal. Nailed it!
Inside Vah Naboris: Terminal 2
Head again to the map room and stand within the round entrance to the room. Rotate the center platform till it’s reset so the 2 chests are in the midst of the room on their sides once more.
Once once more step down into the center into the protected spot then rotate the center platform once more.
Look again to the map room. On your left there’s a platform with a gap. Paraglide over, head by means of the opening, face again in the direction of the room, and rotate the rear phase twice.
When rotated twice, you’ll see the terminal proper in entrance of you, however the fallacious manner up. Step inside and rotate as soon as extra to proper it. Be cautious of the Ganon corruption – seize Terminal 2.

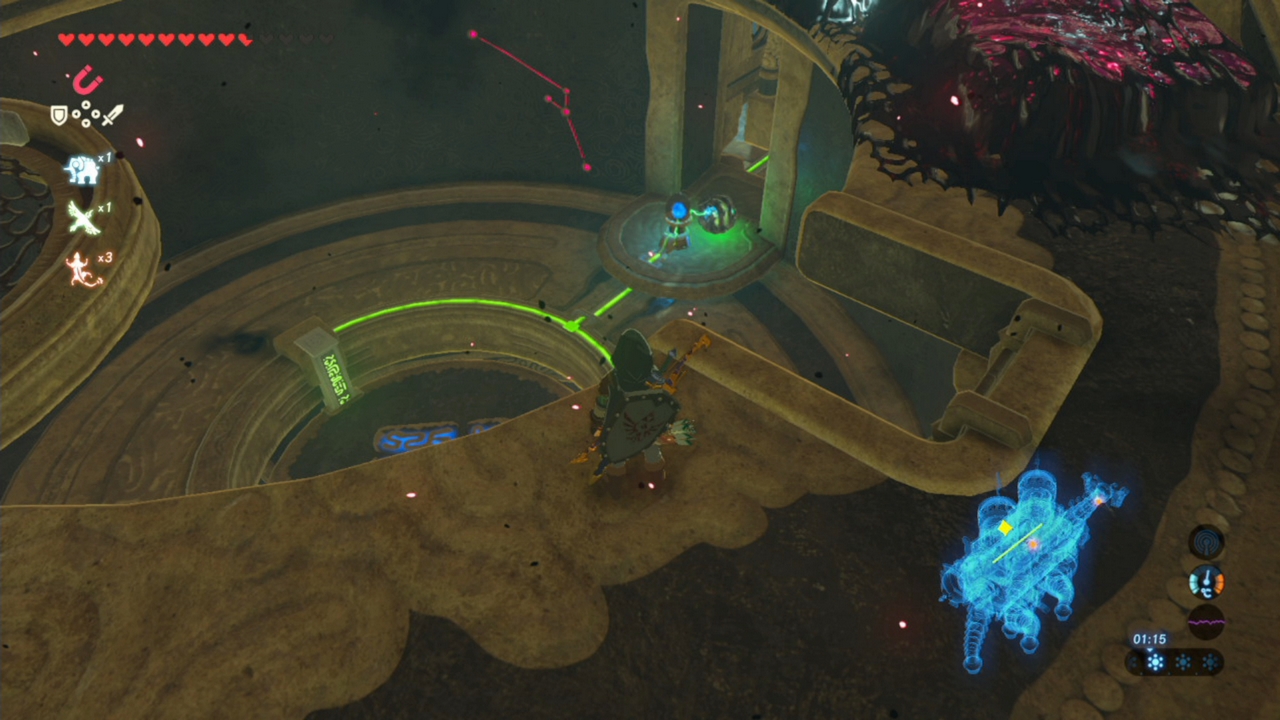
Inside Vah Naboris: Terminal three
Rotate the again part a number of occasions to get entry to the opening as soon as once more, then rotate a number of occasions extra till you may step again out into the central chamber.
Look out to the room. On your left, above the map room, there’s one other ledge. Rotate the rear part sufficient occasions and stand in the proper place to achieve that platform (stand so you find yourself on high of the field room terminal 2 was in) then step into the circle doorway space that doesn’t rotate.
Now have a look at the map display screen. Look on the traces within the rotating sections – these are circuits. Rotate all of them so that they make a line on the high of the Naboris. The far finish will rotate, however don’t fear about that but.
Just right here in entrance of you’re some steel objects. Break out that Magenesis rune and shift them about so that you simply additional create circuit. This will elevate the tail.
We don’t really want the tail raised proper now, however go away the magnesis blocks in place. Instead, break the circuit by rotating any piece of the physique.
With the tail down, stroll out onto it and look behind the tail. there’s circuit factor, however extra importantly it is a protected place to face whereas the tail raises. Rotate the piece again to make the circuit once more, stand right here, and benefit from the journey.
At the highest, shoot the attention. You might must shoot it twice – as soon as to open it and as soon as to kill it. That eliminates a ton of Ganon’s corruption. Head inside. There, shoot one other eye. This will activate an elevator.
Drop down the elevator shaft. Take out the corruption on this room after which get on the elevator. As it climbs there are two platforms reverse one another – one with a chest, one with present conducting ball. Open the chest, then seize the ball and hop on the elevator.
Walk in the direction of the top of the beast. As you move bulb factor, the ball will mild up. It’s activating an elevator! Set it down and take that throughout the in any other case impassable hole.
In this room there’s a guardian. He’s sitting on an elevator. Smash him, then let the elevator rise with out you.
Directly in entrance of you in the direction of the top is the following terminal, nevertheless it’s coated in corruption. Wait for the elevator to rise or fall, then goal in the direction of the terminal along with your bow and look down… slightly below the lip of the elevator ‘shaft’ is the attention. Kill it and seize terminal three. Phew!
Inside Vah Naboris: Terminal four
Look again the way in which you got here, the place the elevator is shifting backwards and forwards. Look down there… there’s a gap! Drop down, then by means of the opening. There are two guardians in right here; take them down.
This opens grates to the round rooms with the elevators in every of the humps.
The activity now could be easy: you have already got one ball – go retrieve it and put it on the primary plinth.
The second ball is within the high of the front-most hump; go retrieve it and take it downstairs, once more placing it on the accessible plinth.
A grate drops; this offers you entry to terminal four. We’re nearly achieved.
Inside Vah Naboris: Terminal 5
Head instantly from terminal 5 out to the entrance hump, the bottom ground. Look out in the direction of the top. Drop down. There’s a wheel you may push right here. Pushing it in a single course will make one wheel on one aspect flip; the opposite the opposite wheel.
Push one course to line up the bulb with the circuit, then do the identical within the different course. This raises the top and lowers an elevator. Take the elevator up.
At the highest of the elevator is Terminal 5. We’re nearly achieved right here!
Float down from the top again to the wheel, then climb up and thru the doorway. Coming on this manner you may safely glide to the second chest from the beginning when you rotate the physique as soon as.

Boss: Thunderblight Ganon
I wasn’t an enormous fan of this boss. Thunderblight Ganon has a sword and a defend – the defend makes it arduous so that you can get in and the sword does completely huge quantities of harm. It’s a little bit of a ache. Honestly, when you don’t have the Master Sword this one is perhaps a little bit of a slog. I used to be fortunate sufficient to have it.
In Thunderblight’s first stage, get in shut and do one full combo to make his defend disappear. Regular size swords are finest for this – they hit sooner. Once his block is down go to city with a second combo, however at all times be conscious and be ready to dam if crucial. Never do extra tan one landed combo on him in a row.
The second section sees Thunderblight smash pillars into the bottom after which strike them with lightning. Wait for pillars to smash, dodging them with a run. Get to a protected distance then choose up one of many pillars along with your magenesis rune. Smash it into him, like we did to the chief of the Yiga Clan not way back.
Thunderblight will fall to the bottom once you contact him with a pillar, so get in shut and hit him arduous when he does. If you’re fortunate you’ll solely have to do that as soon as, then we’re on to section three.
Phase three is all-out conflict – the pillars are gone, nevertheless it’s a souped-up model of section 2 the place it’s even more durable to land assaults. Follow the identical guidelines as section 1, however be much more cautious. If he begins charging his Guardian model laser, contemplate hitting him with highly effective arrows or working in near go wild with a blade.
Eventually he’ll drop. As a reward you get Urbosa’s Fury, a brand new particular transfer that summons a strong lightning strike to an space. You’ve additionally liberated Vah Naboris!


