Scattered around the globe of Destiny 2 are scannable objects which put your Ghost to good use.
Destiny 2 incorporates a whole bunch of scannable objects it would be best to discover. Otherwise, how else will you acquire perception into what occurred earlier than you grew to become the dangerous ass Guardian that you’re? Surely, there was a narrative apart from your personal sooner or later prior to now. Right? Actually, sure, and that is the place scannable objects come into play.
Unlike Destiny 1, Destiny 2 does not make use of grimoire cards. Bungie changed the playing cards with scannable objects with a view to embody Destiny’s lore inside the recreation world.
Before we go additional it’s value testing our Destiny 2 guide since you’re going to come back up towards a complete bunch of enemies and it’s clever to have your best exotic weapons outfitted should you can. Once you’re equipped, let’s crack on…
In Destiny 2, the lore is advised by way of Adventures, the characters and thru the marketing campaign, it’s additionally advised by way of scannables you discover all through the world. It’s a quite good departure.
To discover this stuff, whip out your useful Ghost and have it sweep the world. You could need to stroll round a bit, as a result of the system’s vary isn’t giant and a few objects could also be hidden. Using your Ghost on this method will spotlight close by objects within the Destiny 2 UI, and upon interacting with stated object, you’ll be handled to lore-related goodness.
Alternatively, you’ll run throughout objects once you don’t have your Ghost out. When this happens, the sport will immediate you to “Investigate” the thing.
Since there are a lot of scannable objects within the recreation, once you come throughout one in an space just like the European Dead Zone (EDZ), you might want to make a psychological word. The recreation is giant sufficient as is with out revisiting an space for an object you’ve already discovered. Your finest wager on this case, is to attempt to discover all scannable objects within the space earlier than transferring on.
Not all areas might be devoid of enemies, which suggests you might need a tough go of it. If you discover that is the case, you might want to degree up a bit or mess around along with your construct earlier than returning to an space rife with Cabal or Vex. If you’re new to Destiny otherwise you need to tweak your loadout, check out the assorted Destiny 2 Titan, Warlock and Hunter builds for some suggestions. You may additionally want to peruse the varied abilities and subclasses available in Destiny 2 as our Destiny 2 guide particulars.
If you’re having points with getting your butt whooped, bear in mind: it’s all about Power this time round as a substitute of Light. Leveling your Power quick isn’t that troublesome, as you may attain Power degree 20 simply by completing Destiny 2’s Homecoming mission. If all else fails, right here’s some tips about easy methods to level up and get more Power in Destiny 2 fast.
With all of that out of the best way, let’s get you began on discovering scannable objects positioned in Earth’s European Dead Zone. There are 41 in complete, so we’ve damaged issues up for you by space and the variety of objects.
If you’d quite give the video a watch than learn the step-by-step directions under, simply give the play button a click on.
Outskirts (5)
")
1): The best approach to get to the primary merchandise within the Outskirts is to undergo the Trostland touchdown zone and work your round. As quickly as you enter the Outskirts, take a left and stroll to the crimson steel constructing with the burned out automobile. Facing the constructing, to the suitable, you will notice the primary merchandise to be scanned nestled within the nook. It is a fishing internet full of canisters.
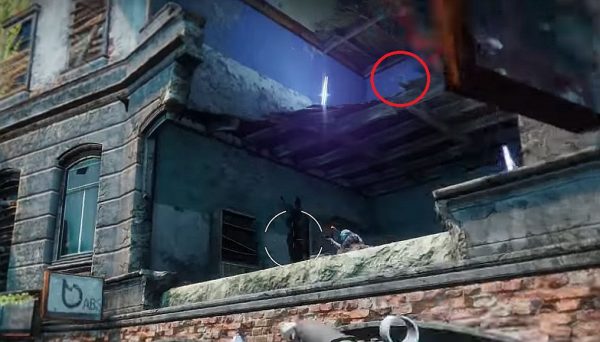
2): Spinning round and dealing with the best way you got here, make your means towards the homes on the suitable hand aspect. Go previous the burned out bus and up the trail resulting in the homes. Jump down off the trail touchdown in entrance of the homes beside the classical statue holding a water jug by the pool. Face the homes and you will notice a wall is lacking within the center part above a brick facade. Jump up the wall onto the primary ground, after which as much as the second ground. Turn round to face the best way you got here and to the left you will notice a set of shanks handing in some netting. This is the second merchandise you’ll scan within the Outskirts.
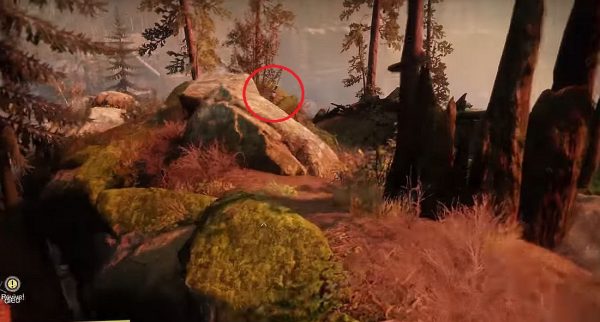
three): Jump down from the second ground of the constructing and make your approach to the suitable of the pool. Go previous the damaged statue in your left towards the derelict constructing. Jump onto the stone ruins, by way of the constructing, and onto the cliff behind the ruins. Make your means across the left aspect of the small cliff leaping on the small boulders. When you attain the tip, flip round barely to the left, you will notice one other relay antenna nestled in between two rocks behind a small cluster of bushes. This is the third object to be scanned.

four): From the third object, work your means towards the bridge which overlooks the Lost Sector. This one is a bit difficult as a result of you might not see it, relying upon the place you’re standing on the bridge. There is, nonetheless, a raised a part of the bridge resembling a step of kinds. Stand there, and face the rocky space. Go to the sting of the bridge and look down on the pool of water. At the again of it, behind a mossy rock, one can find the fourth object.one other destroyed servitor which is

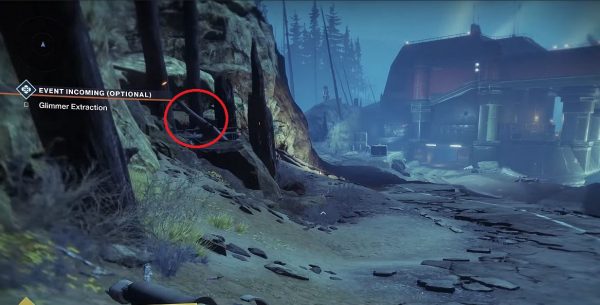
5): From the bridge, comply with the trail down maintaining the lake in your left. When you come to the second dilapidated car, hold straight on the fork and stroll previous one more dilapidated car which might be in your proper. Go up the trail a methods and to your left you will notice what seems to be packing containers coated by a tarp with Fallen markings. This is the fifth and ultimate object to scan within the Outskirts.
The Farm (four)
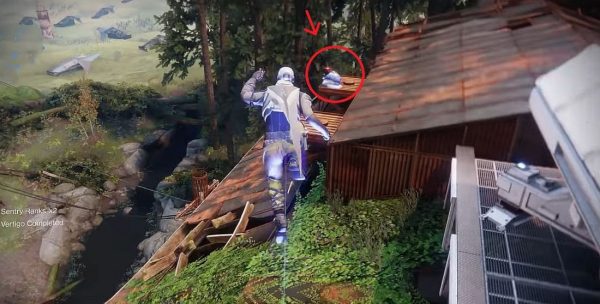
1): The first object is on high of the barn. You might want to make your means onto the roof of the Farmhouse beside the Postmaster and stroll throughout the ability traces which hook up with the barn. Jump off the wires and onto the barn roof and stroll over to far finish. Looking down, you will notice two platforms. The platform on the suitable options packing containers and a few sacks. Jump down onto the platform and scan the highest sack and also you’re carried out.

2): Scannable object quantity two is a quite straightforward get. Make you means off the roof of the barn and stand dealing with it. Turn to the suitable and head off into the bushes previous the pad the place you spawn into the farm. This will take you to a cliff overlooking the ocean. Scan the sacks for the second object.
three): After you seize object two, return the best way you got here and stand on the spawn pad. Turn to the left and you will notice a cliff on the opposite aspect of the docks. Jump right down to the docks and run previous them to the cliff. You will see giant rocks jutting out of the aspect of the cliff, and leaping up you will notice a grassy ledge resulting in extra scannable sacks. Go up the ledge, and bounce over to the cliff to scan the sacks.

four): The final object is positioned quite shut. Jump again right down to the docks, go to the left. Keep left previous the Evergreen Trading Company and stroll up a small ridge to tree. On the opposite aspect of the tree is a sleeping bag specified by entrance of a small pool. The sleeping bag is the ultimate scannable object at The Farm.
Firebase Hades (four)
1): If you haven’t discovered the touchdown zone but, simply come into the world through The Gulch. Upon getting into the world, hug the left hand aspect of the trail to the lifeless tree trunks. There is a big rock behind the tress and your first object is a set of canisters in netting nestled between the rock and a tree trunk.

2): From the primary merchandise, flip and face north. Run by way of the trail which leads below the constructing – or hop in your sparrow for a fast time of it. When rising from below the constructing, deviate from the trail a bit to the suitable and hug the cliff wall. You will see a set of three missals stacked on high of two crates. Go behind the crates, nonetheless maintaining the wall in your proper. Once you will have handed the missals, on to your proper up in a darkish nook you will notice what seems to be a big, steel protected. The second scannable object is hanging on the again wall. Since it’s a bit darkish, whip out your Ghost to spotlight it.

three): For object three, flip and face the wrong way. Go proper and stroll below the constructing maintaining to your proper. Continue staying to the suitable till you attain the tip of the walkway, and bounce up on the grated platform which is, once more, in your proper. Ahead of you’ll be one other raised platform. Jump on it, go inside and take a look at the ceiling.

four): The ultimate object is positioned not removed from the third scannable object. Turn fully round, bounce off the platform and as soon as once more head off to your proper. Just earlier than you attain the fork within the highway, comply with a brief grime path which takes you up on a rocky ledge overlooking the highway. From there, you will notice a rocky outcrop on the opposite aspect of the highway with loads of bushes. To the underside proper is a Fallen antenna so that you can scan.
Trostland (four)
1): Drop into the touchdown zone. Turn proper and head towards the buildings and to what seems to be a ruined metropolis park. There is a burned out semi-truck. Continue straight by way of the park in direction of the buildings and you will notice a burned out semi-truck. Inside the cab of the truck is the primary scannable object in Trostland.
2): You gained’t need to stroll far for this one. After scanning the thing contained in the truck, flip full circle and look behind you. The constructing to your proper has a Fallen banner hanging off the aspect of it. Scan it.

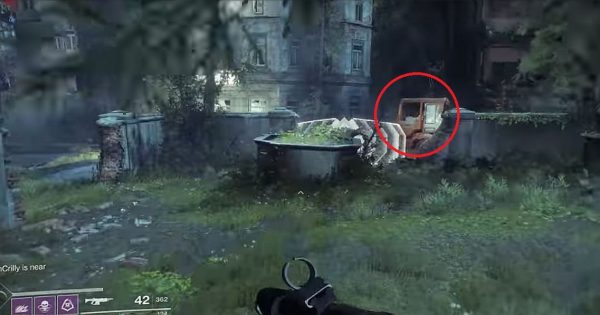
three): After scanning the banner, flip round and face the truck once more. Go to your proper alongside the buildings. Keep to the suitable. On your left is a church and in your proper a wall alongside the road with fairly, purple flowers. Jump over the wall, making a gentle proper and you’ll a ruined constructing with a brick facade. It contains a ABS Kastner signal. Just as much as the primary ground to succeed in the second ground. In the far proper nook is the third object you will have to scan. It appears to be like like a inexperienced cooler.

four): From there, flip round and face the opening, and you will notice the church earlier than you. Jump down, and whereas nonetheless dealing with the church, go to the left of it, or by way of it, nonetheless you want. On the opposite aspect of the church is a constructing with two rust automobiles in entrance of it with a Schnell signal. The constructing subsequent to it, with an Ansel signal, has been blown open and that is the place the fourth and ultimate object is positioned. Jump up onto the primary ground and to the suitable of you hanging from the ceiling is a internet bag full of what appears to be like like canisters. Scan it and also you’re completed with Trostland.
Maevic Square (three)

1): Take the trail east out of Trostland to succeed in Maevic Square. From the touchdown pad, go proper and stroll straight into the ruined construction. Follow the wall left and go previous the reception desk on the suitable. On the opposite aspect in a ruined room stuffed with rubble is a Fallen weapon. Scan it.

2): From object one, spin round and face the blown out double doorways behind you. Go exterior, run by way of the courtyard to the constructing straight in entrance of you. There are vines rising on it. To the left of the vines is a tree, and behind it’s the second merchandise to scan. It is a crate coated by a tarp. If you’re having a problem seeing it, simply pull out your Ghost and provides the world a very good scan.

three): While trying on the second merchandise you scanned, flip to your left, hug the wall, run by way of the world with enemies and kill them. Go previous the buses within the center to the left hand aspect of the world, work your means in direction of the ruined, stone steps. Go up the steps and within the rubble is the third and ultimate scannable Item.
Salt Mines (three)
1): To attain the primary scannable object within the Salt Mine, the simplest approach to get there may be to undergo the again of the church in Trostland. There, you will notice a constructing behind a ruined truck and simply inside the doorway is the place a small band of Fallen hang around. The mines are stuffed with Fallen, so be ready to struggle. Once inside, undergo the doorway subsequent to the truck with the Fallen sigil and simply run alongside the pure path by way of it. Run by way of all of the corridors till you attain a constructing with what appears to be like to be a pale signal which will have stated Salzwedel sooner or later.
Go into the constructing run by way of all of the corridors till you attain a mining space stuffed with packing containers, rubble, outdated pipes and different detritus. Hug the left, go up the steps, by way of the quick corridor, and out the door. Straight forward is one other set of stairs resulting in a room. Go inside and you will notice a banner with the Fallen sigil. Scan it and you should have the primary object checked off the listing.

2): From the primary scannable object, take a proper, drop down, and make your approach to the mine entrance straight in entrance of you. Continue by way of till you see a semi-truck (or lorry in case you are within the UK). On the left is a steel, grated walkway. Go down the walkway and into the subsequent space, hugging the mine wall. Keeping straight, you will notice a crater within the wall with one other semi-truck partially buried within the grime. Behind it and to the suitable is the thing glowing purple. Scan it.

three): After the third object is scanned, flip round and begin heading by way of the mines once more. Go over the rusted out, raised management space and thru the door alongside the far wall behind it. Inside, you’ll be standing on a steel grate and you will have to leap throughout to the opposite aspect of it. To the suitable you will notice a terminal. Scan it and get the heck out of the Salt Mines.
Sojourners Camp (three)

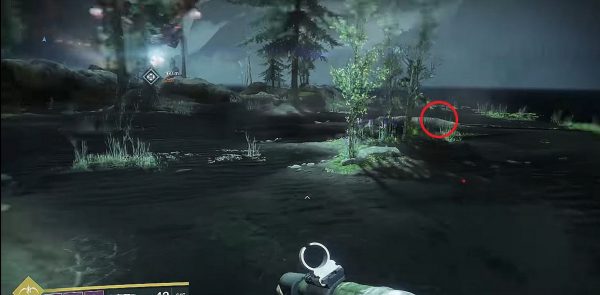
1): When following the trail main south out of the Outskirts, you’ll enter Sojourners Camp by way of a tunnel. Follow the grime path out of the tunnel and right into a forested space which results in the camp. At the fork simply earlier than the tent, take a proper and stroll by way of the small pond to the cliff’s edge. There, you will notice what seems to be a destroyed servitor. This is the primary scannable object.

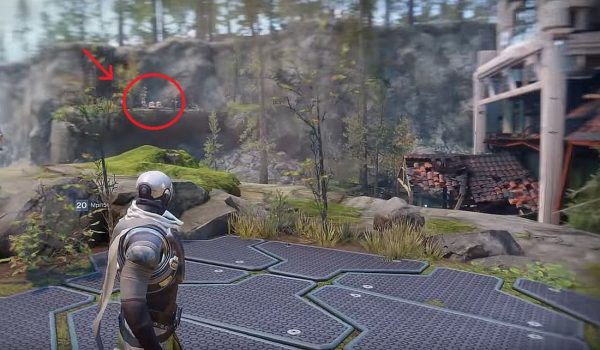
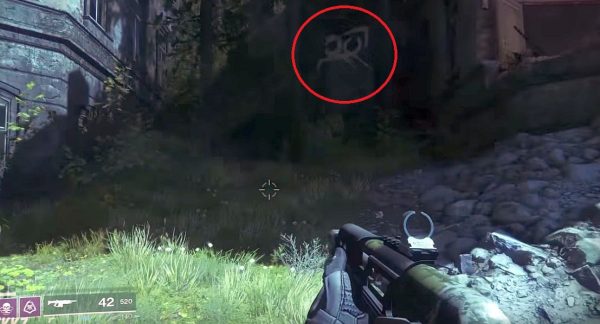
2): After scanning the primary object, flip left and use your rifle scope to take a look at the closest cliff. You will see what appears to be like alike a gold communication relay. Make your means in direction of it by strolling alongside the sting of the cliff you’re standing on. Just don’t fall. When you attain the relay, give it a scan.

three): After scanning the relay, put your again to it. Start strolling straight and go previous the crates scattered in regards to the clearing. Continue going straight towards a cliff aspect the place you will notice small, mossy tree trunks. Behind these, sitting on a rock towards the cliff aspect is an object coated by fabric. This is the third, and ultimate scannable object at Sojourners Camp.
Sunken Isles (three)
1): The first scannable object will not be removed from the touchdown zone. Drop in, look north east towards the water. Jump down into the shallow space of the lake and head to the small island with bushes and beautiful purple flowers. At the each again of this small patch of land is a crimson crate which will be scanned.

2): From there, flip to your left and head straight. Jump over all of the rocks and anything you come throughout till you attain a mud path. Follow it towards the massive Cabal construction which might be in your proper. Continuing straight, bounce over the massive rock and you will notice roundish, steel bunker. Go inside, scan the pc panel.

three): Go out the exit, run towards the left of the massive, crimson Cabal base and you will notice the doorway. Go inside, hold to the left and behind the massive crates coated in crimson tarp you will notice the third scannable object hooked up to the wall.
The Gulch (three)
1): From the touchdown zone, run ahead and bounce throughout to the rock ledge in entrance of you. Run into the open space the place Public Events happen, bounce over to the opposite aspect the place the highway has collapsed. Basically, you’ll rock bounce throughout the forest ground to succeed in this elevated space. When you attain the collapsed highway, make a slight proper, bounce up on the boulder, go throughout it, stroll throughout the fallen log, maintaining the damaged highway in your left, till you attain the rocky ledge. There, in entrance of you is the primary of three scannable objects.
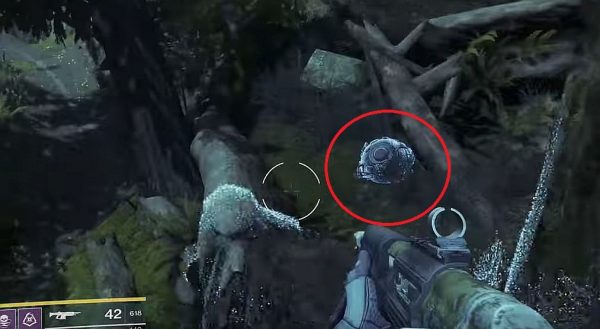
2): Jump down onto the highway from the primary merchandise scanned, flip proper, and begin strolling down the highway. When you attain the water, go left barely the place you will notice a bit of huge tech to the suitable of small cave entrance. Jump above the cave into the bushes and behind some fallen logs to the left is one other Servitor. To discover this merchandise extra simply, once you bounce over the cave entrance, use your Ghost to scan the world.

three): After scanning the second object, bounce right down to the cave entrance, go inside, and scan the glowing shard.
The Sludge (three)

1): From the touchdown zone, head into the forest. To the left of the pond with the turned over car is the primary merchandise to be scanned in an open portion of the cliff wall behind a tree. It is a glowing, purple shard. Scan it.

2): Facing the shard, head to your left and go into to the subsequent space by hopping as much as the ledge. Go below the construction following the damaged highway till you see a brick constructing in your left. Go into the open doorways of the constructing, bounce to the suitable and onto the crates. Behind these, you will notice an electrical field on the wall with wires popping out of it. This is the second merchandise you will have to scan.
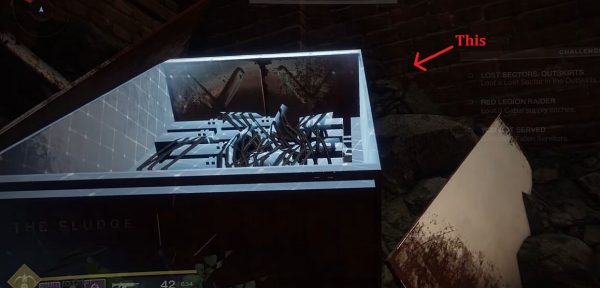
three): Come out of the constructing you have been in for the second object, run ahead till you attain a construction which might be in your left. Hug the wall to go beneath the overhanging beams. Under the primary beam, the again left nook of the world you will notice a big, steel field stuffed with wires with the again out of it. This is the third, and ultimate object you’ll scan in The Sludge.
The Tunnels (2)

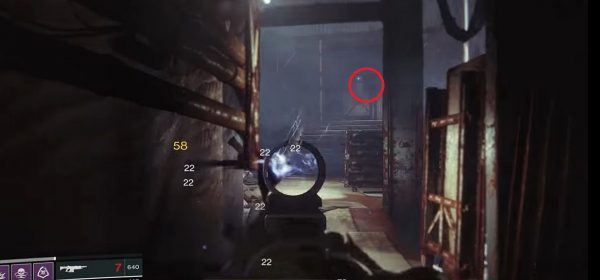
1): From the Gulch touchdown pad, you will notice a big tunnel with a yellow border minimize into the cliff. This is the place you will have to go to enter the Tunnels. Keep going straight till you attain the thirteenth tunnel door. You will know you will have reached the world once you see a crimson, steel constructing inside with two, broad entrances. Facing the constructing, take the suitable entrance first. Just hold following the trail as a result of at this level there is just one means you may go. When it opens up, you’ll have to struggle a Centenarian. Facing the doorway closed off with a big, spherical yellow door flip all the best way round and you will notice an entrance to a darkish room and within the again is an alcove-like space. Pull your Ghost out, and scan the world for the merchandise hooked up to the ceiling.

2): The second merchandise you could scan will take some backtracking. Go again to the thirteenth entrance the place you noticed the crimson, steel constructing. Go to the left, by way of the fourteenth entrance. Follow this tunnel all over till you attain an open space. Go throughout the bridge with partitions of mills on all sides that takes you towards the subsequent tunnel entrance. Close to the beginning of the mills on the suitable hand aspect, you will notice a small hole. Here, in direction of the again is your second and ultimate merchandise. Use your Ghost to gentle the small space up if wanted.
Winding Cove (2)

1): Drop into the touchdown zone and run straight ahead up the rocks maintaining the lake to your left till you attain the tip of the rocks. Jump off the rocks and head to the small rock outcrop with bushes within the shallow water. Jump onto it and comply with the suitable fringe of it (or drop down into the outlet to explore the Lost Sector first). Behind the massive rock is a Fallen antenna. This is the primary merchandise to be scanned.

2): While nonetheless trying on the first object, flip to your proper and look off previous the fallen log to the left see a rock path resulting in a small hill with bushes. Head over to this space, and on high of the mossy rocks and fallen bushes is a inexperienced field which blends in a bit. This is the second, and ultimate object you will have to scan within the space.
Legion’s Anchor (1)
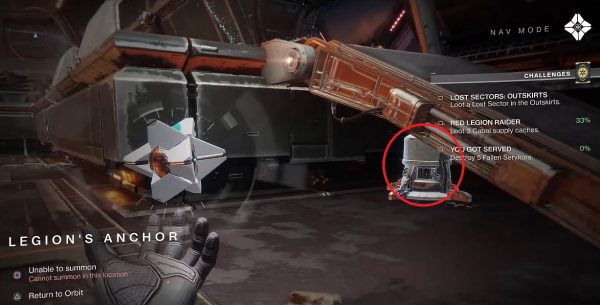
1): From the doorway, simply work your means by way of, as there’s just one approach to go. To the left, there’s a raised entrance. Go as much as it and it’ll take you exterior. Take the patch to the left and hug the wall all the best way down till you attain the ramp down. Once you will have gone down the ramp, flip and face the wrong way, and below the ramp, now in your proper, is the one scannable merchandise in Legion’s Anchor.
Legion’s Hold (1)

1): There is just one scannable object in Legions’ Hold and it’s positioned within the Sunken Isles. Your finest wager right here is to scan this object if you are scanning Sunken Isle objects because you’re there already. What you could do is go up the ramp which takes you inside the massive Cabal ship. There’s just one approach to go contained in the provider so don’t fear about getting misplaced. Once you will have adopted the trail to the tip, you’ll enter a big room. Walk to the massive round platform within the center and go to the again proper of it. Go to the very again wall, once more staying to your proper, and you will notice a ramp which takes you to the again wall of the room. Underneath this ramp to the suitable is the one scannable object on this space.
Source


