Monster Hunter: World Behemoth: how to fight it, what is its weakness


Monster Hunter: World has seen a fair number of collaborations, the latest one on PC will be between Capcom and Square Enix. The Behemoth update comes with some new armour, emotes, references to Final Fantasy, and a new Elder Dragon in the form of Behemoth. While not a siege battle like Kulve Taroth, this creature is perhaps the toughest single monster that you can kill in Monster Hunter: World to date. This will be a permanent addition for the game, with an extreme version used for limited time events, so you'll need to know how to kill this hulking giant. This guide will go over the strengths and weaknesses, as well as all these interactions that you should be aware of going in, while of course keeping your distance.
Monster Hunter: World Behemoth guide
This is the toughest Elder Dragon that you'll face yet, capable of total annihilation of your party if left to its own devices for too long. In order to get the advantage, you'll need to be well prepared, so for those looking to get some more tips on everything from combat to items, head on over to our Monster Hunter World guide hub.
If you are looking for specifically Monster Hunter World Iceborne guides, then we have created a separate guide hub for just expansion stuff. Head over to our Monster Hunter World Iceborne guide to make your start.
Also, despite the fact that this sounds like a guide that John Walker would have made up, it's completely real and deserves some backstory.
Behemoth is a bit of a series staple in the Final Fantasy series. It first appeared chronologically in the series as a boss in Final Fantasy II, but also featured as a regular enemy later on. It also saw first appearances in the US as a mini-boss in Final Fantasy IV and in Europe in Final Fantasy VII. They're often regarded as one of the tougher fights, with some even casting magic that reduces HP to single digits.
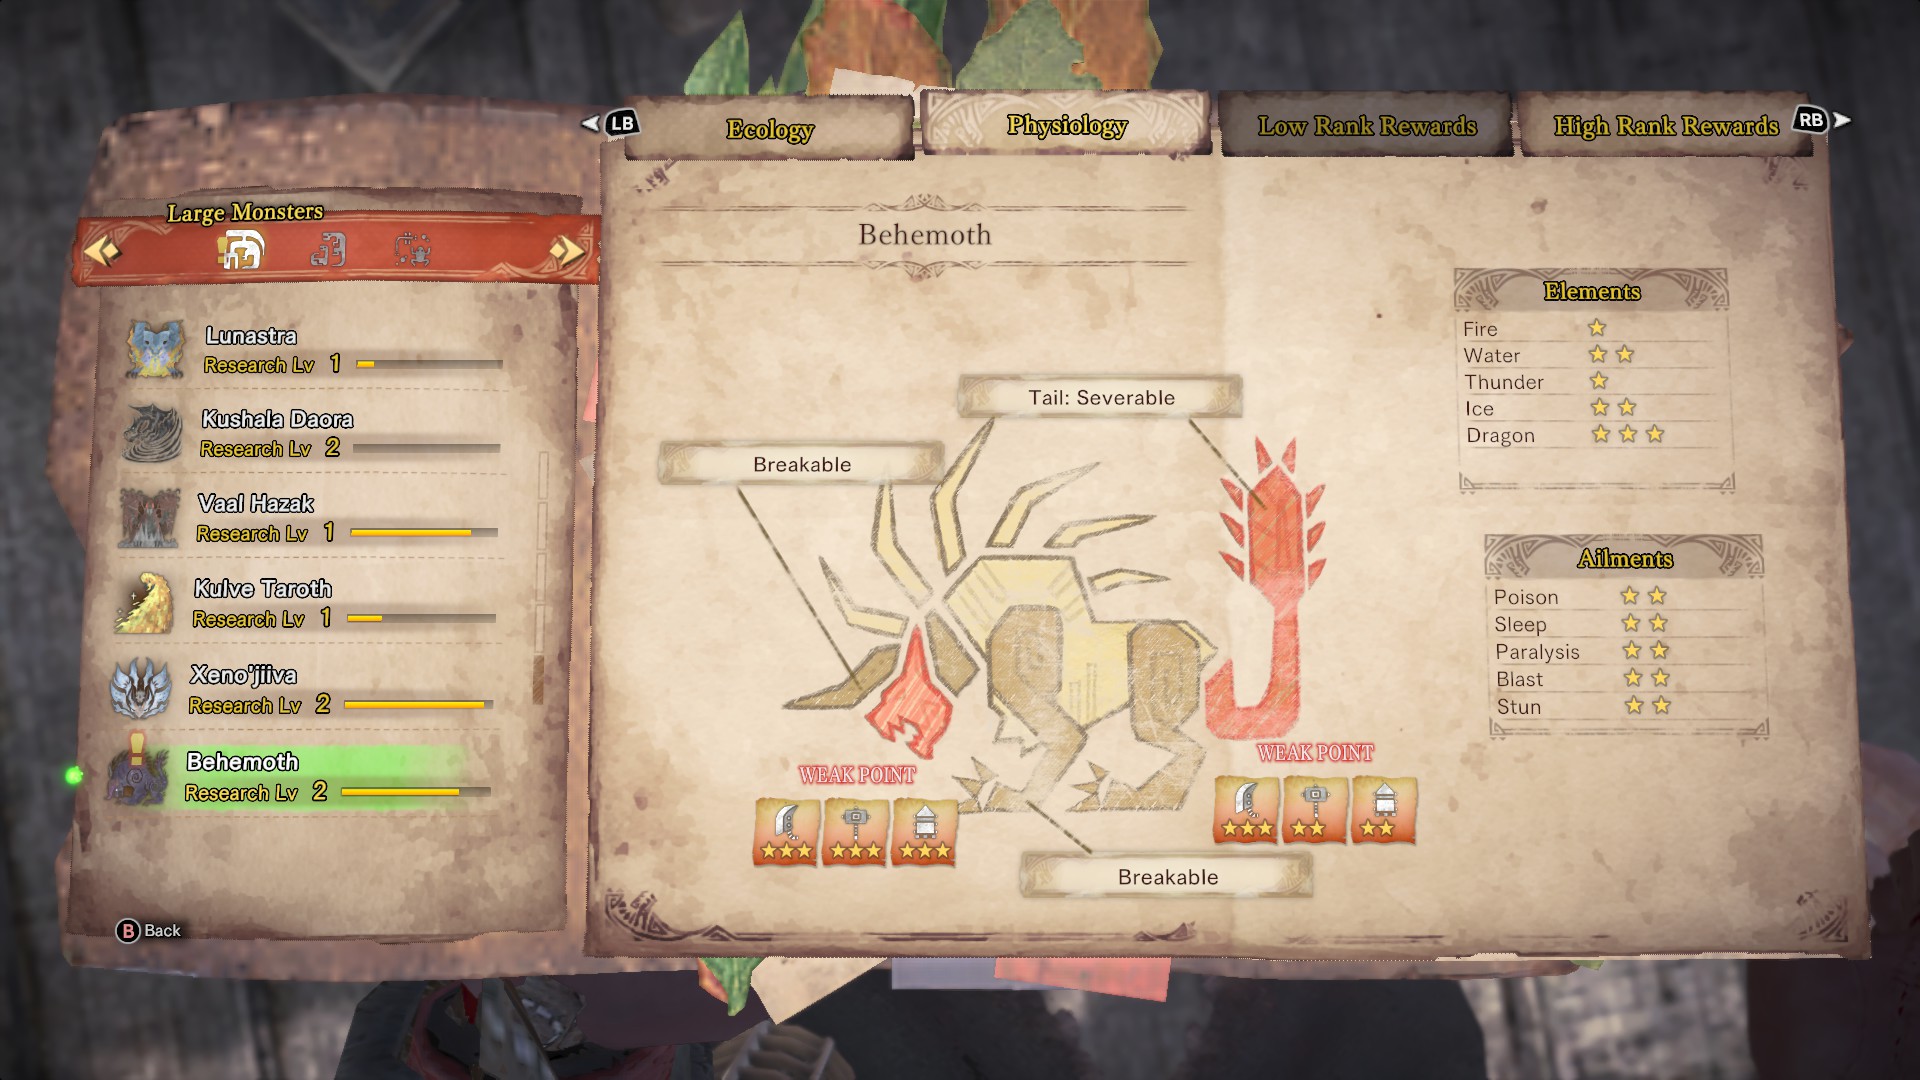
Behemoth's weaknesses and resistances
Behemoth's head is the weakest point as all weapons do the same damage, though attacking the head also attracts the Behemoth's attention. You can also attack the tail for big damage, particularly if you're using bladed weapons, but you may also wish to consider attacking from afar to be relatively safe from most of its attacks. Its head and front claws are breakable, while the tail is severable. However, despite this, there are some specific properties for attacking the head which we'll get to in the strategies portion.
In terms of which weapons to bring, those with the Dragon element weapons tend to do the best damage, while fire and thunder are the worst elements to use against it. Should you decide to go down the ailments route, there are no special resistances or weaknesses to take into account as it is equally susceptible.

Unlocking the Behemoth quest
First and foremost, you'll need to reach at least Hunter Rank 16. This means you have at the very least completed the main story by defeating Xeno'jiiva and saving the new world. If you're struggling with this baby Elder Dragon, head to our Monster Hunter: World Xeno'jiiva guide to learn more about how to defeat it. You'll then see the mission - A Visitor from Another World, in which you must go to Wildspire Wastes to follow the Cactuars (another Final Fantasy creature, they're green cacti with faces and limbs). These can be caught for a reward of 85 research points per capture.
They will lead you to a Kulu-Ya-Ku who has taken hold of the crystal and powered up as a result. You'll then need to slay this tainted beast to allow the Cactuars to reach their destination: Elder's Recess. From there, the Behemoth quest will be unlocked. The Kulu-Ya-Ku quest is repeatable and boy will you be taking a few attempts with this one. I highly recommend taking all the barrel bombs that you can muster, as well as the Vitality Mantle - it will help during the fight in a big way. Don't bother with status affects for this fight as they won't have any affect on this overgrown chicken.
The basic premise is that Kulu-Ya-Ku's most dangerous form is when it's holding onto a rock. Now imagine that but the Kulu-Ya-Ku grows larger with each phase of the fight. Most of its attacks will deal a good chunk of your health, but the ones to watch out for are when it begins to rear up for a jump. It will attempt to slam the crystal right onto your bonce, so as soon as you see it take a step back, begin to prepare to dodge by running sideways and diving. It's especially dangerous when it's at its biggest, so try to save your Vitality Mantles for the final phase of the fight.
I'd also highly recommend taking a full squad with you. They'll be able to give you some breathing room to enable you to attack it more consistently. Since the large monster's health only increases when the second player joins, there's no disadvantage to taking a third and fourth player. More on that in our Monster Hunter: World PC multiplayer guide.
Normally in a fight you'll be looking for a staggering enemy to plant the barrel bombs, but this one works slightly differently. Instead of it sleeping, it'll use the power of the crystal to restore its health. Your window of opportunity to plant and detonate the bombs is very tight, so try to get stones in advance to trigger the explosion. If you leave it too late, it'll survive the explosion, thus forcing you to repeat the previous phase of the fight. This is a very tough fight that will take an interminable amount of time, but eventually the stars will align and you'll slay this beast. Once you've completed the quest, you'll then be asked to repel the Behemoth once (this is until you've dodged the Ecliptic Meteor attack), before the true fight to slay the Behemoth begins.

How to fight Behemoth
More than any fight in the game, this is one fight where you need to bring specific items. Lifepowder is especially helpful as your teammates will need healing as much as you do, while bringing as many flash pods and flash bugs as you can, coordinating when you're going to use them, will help in clutch moments. Just don't try to take any traps, as Behemoth is completely immune to all of them. The Temporal Mantle is also very useful for this fight, so ensure you've unlocked it before attempting it.
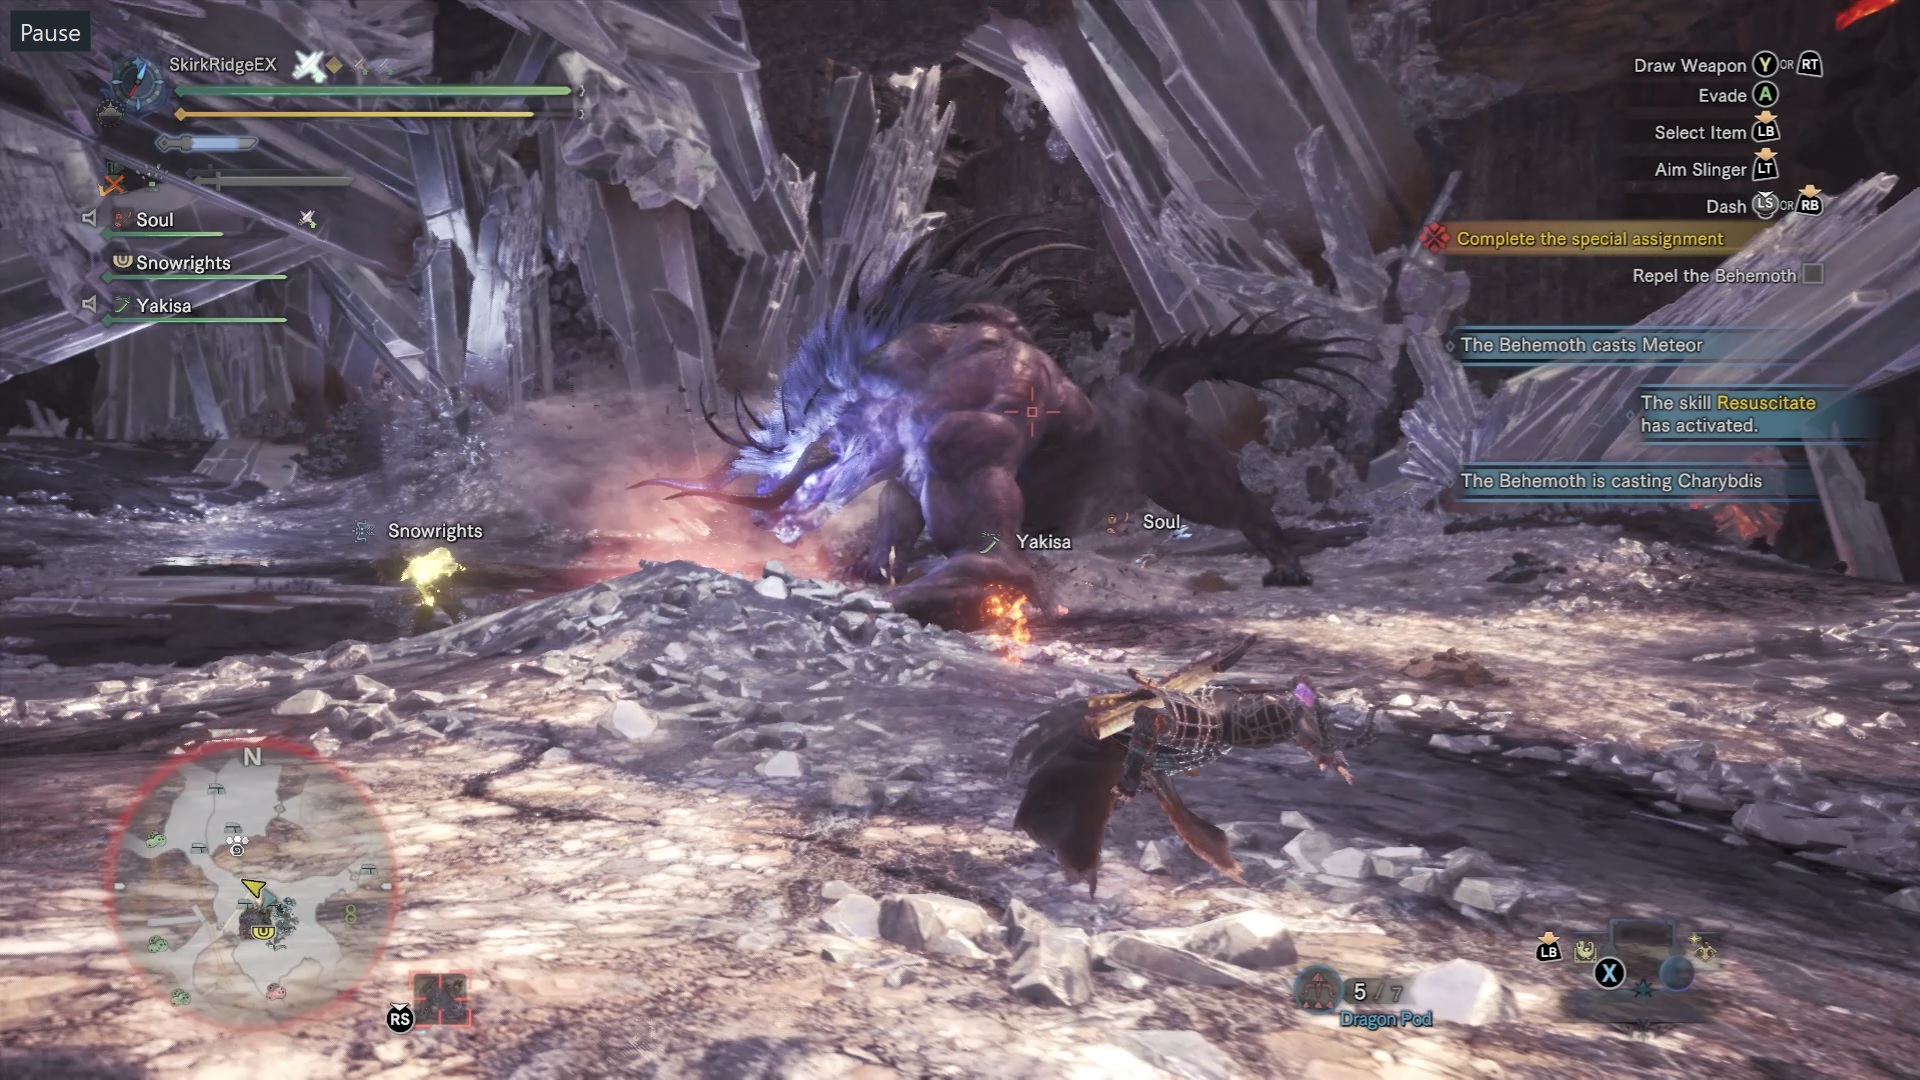
This fight is intended to be taken with a full squad of players, with one player taking on the role of a tank. To do this, the tank must attack the Behemoth's head, either by firing ranged weapons or using slingshot ammunition which is found lying around all over the place. This is called attracting "emnity" in the game, which means its sole focus is on the tank, meaning others can take a more active role in damaging it. If the Behemoth has line of sight on the person with emnity, it's represented by a small text prompt, as well as a red line from its eyes to the offending player's hunter. Bladed weapons are generally the right way to go over blunt weapons, but the relative safety of attacking from afar is also attractive.
Like Final Fantasy games, the fight against Behemoth will include little text boxes that warn you of when Behemoth is about to cast certain spells. This can be used to prepare long in advance, or know when to dodge. As you'll be teaming up with others, you'll need to assign roles, one of which will be a tank role to try and gain Behemoth's enmity. This is done by repeatedly poking at it in the head, either with melee weapons or ranged weapons, while your teammates get the greater amount of damage with relative safety. Status effects can reset the aggro, so if you're the designated tank, make sure you're the one that's bashing its head to regain it as soon as possible. It can also tail swipe, so try to hack off the tail as soon as you can, as this will severely reduce its range.
Behemoth's attacks
One of which is Charybdis, which will summon tornadoes, with a wind trail that follows the target player before being cast. These can quickly escalate into chaotic situations where there are too many tornadoes around, so use a flash pod when the prompt says it is casting Charybdis, or use the shots found lying around to bring down the ceiling on it to interrupt the attack. This can be interrupted by attacking its head too, but this can be inconsistent. If you're the player being targeted, try to run to the edge of the room so that the tornado isn't anywhere that will matter for the duration of the fight.
Other attacks that it can have include Meteor, which will be prompted by text, as well as a small impact zone being highlighted before it hits. Be sure you're not in the area when it does, as it will inflict fireblight. If you're lit up in flames, just roll around three times to put it out. The meteor has different properties depending on which phase of the fight you're in. Sometimes it'll target one player, while others everyone in succession. Just focus on your dodging of this attack if needed. If you have emnity however, you'll be the sole target, so try to ensure you're away from the others.
It also has a range of swipes, a thunderbolt, a flame burst attack that affects a cone shape in front of it that's not prompted but telegraphed by its face glowing red, and can charge with its horns for a lot of damage. This charge is mostly in the third area of the fight, which can impale you, causing the bleed status, as well as allow it to thrash you around for a bit. You do not want to be on the other end of that attack. There's also a huge windup tail attack that deals a lot of damage, but has a long time to initiate for you to get out of the way.
When fighting it, try to stick to its front left leg as barely any of its attacks are used with its left arm. Another thing to keep note of is whenever Behemoth is left alone in a zone that you've begun fighting in, it'll start to regain health. You evidently don't want to do this, so make sure someone is fighting him at all times. Also, it doesn't cast Charybdis when under the influence of emnity, so make sure someone is always attracting the boss's attention.

How to dodge the Ecliptic Meteor attack
Another big move it can use is Ecliptic Meteor. During the battle, it will try to use various spells. One of them is Comet, which slams a rock into the ground from the sky. Unlike standard meteors, these don't explode, and unlike Ecliptic Meteor, these are more useful to you than the Behemoth.
Pay attention to where the Ecliptic Meteor's impact zone is, it's characterised by the red circle. Make a dash towards the nearest comet that has landed in the area, positioning yourself so that upon the Ecliptic Meteor's impact, the shock wave will just destroy the comet you're hiding behind. You can also use the Final Fantasy XIV update exclusive jump emote, but the timing is very precise. Nothing else will work, not even warping back to the camp, it's that devastating. Also, don't destroy any of the comets it drops, because that is doable and will doom your team.
This attack marks the end of each phase of the fight, as well as the end of the hunt itself as it uses it as a final desperation attack to try and wipe the team in one go. Make sure you set up the comets in a way that you can get to them easily, and you shouldn't have any reason to fear this attack.

What materials can I get from Behemoth?
Since the Behemoth is an Elder Dragon, you can't capture it, and this one can only really be taken on by partnering up with others. At this point you've probably connected with a few other players for multiplayer, but you can check out our Monster Hunter: World PC multiplayer guide for more information. Behemoth has some materials that are vital for those who want to have a very good Insect Glaive, you can either check out our Monster Hunter: World combat guide or our Monster Hunter: World armour guide. In the list below, the stars indicate the frequency in which the item in question will drop, as well as details on whether some items are obtained by breaking a specific part of the monster.
| Item name | Rarity of materials gained from carving | Combat and carving notes | Rarity of materials gained as rewards | Reward notes |
|---|---|---|---|---|
| Behemoth Mane | ***** | Can be dropped or carved. | **** | |
| Behemoth Bone | **** | ***** | ||
| Behemoth Tail | *** | Obtained by cutting off its tail. | ** | |
| Behemoth Shearclaw | *** | Obtained by breaking its front claws. | *** | |
| Behemoth Great Horn | ** | Obtained by breaking off its horn. | * | |
| Aetheryte Shard | N/A | **** |
When you've finally taken down the Behemoth, you've defeated the final monster that's come from the free updates. All that's left until Monster Hunter World: Iceborne is to repeatedly hunt monsters to get decent equipment to prepare yourself for the new island. You can learn more about the previous monsters introduced in the free updates from our Monster Hunter: World Deviljho, or our Monster Hunter: World Lunastra guides. There is also another elusive Elder Dragon that only appears once in a blue moon, so prepare in advance by looking at our our Monster Hunter: World Kirin guide.