Monster Hunter: World Bazelgeuse: how to kill it, what is its weakness
Bazelgeuse, Bazelgeuse, Bazelgeuse!


Like that spectre that just won't go away, Bazelgeuse is essentially Monster Hunter: World's bogeyman. Appearing as if out of nowhere, it is attracted by the scent of blood, mostly from other larger monsters being attacked. As an apex predator, it knows how to throw its weight around, splintering off explosive shards from its underbelly and tail to keep . In this guide, there are strategies for how to deal with the constant barrage, as well as the its weakness and tips for how to kill it.
Monster Hunter: World Bazelgeuse guide
Bazelgeuse can make hunting other monsters a right pain, as its attacks can be utterly devastating if you're caught in the crossfire. For that, having dung pods to repel this creature is a must, but can be useful for repelling other creatures away from Bazelgeuse. Head over to our Monster Hunter World guide to get some general tips, as well as information on exactly what dung pods do.
If you are looking for specifically Monster Hunter World Iceborne guides, then we have created a separate guide hub for just expansion stuff. Head over to our Monster Hunter World Iceborne guide to make your start.
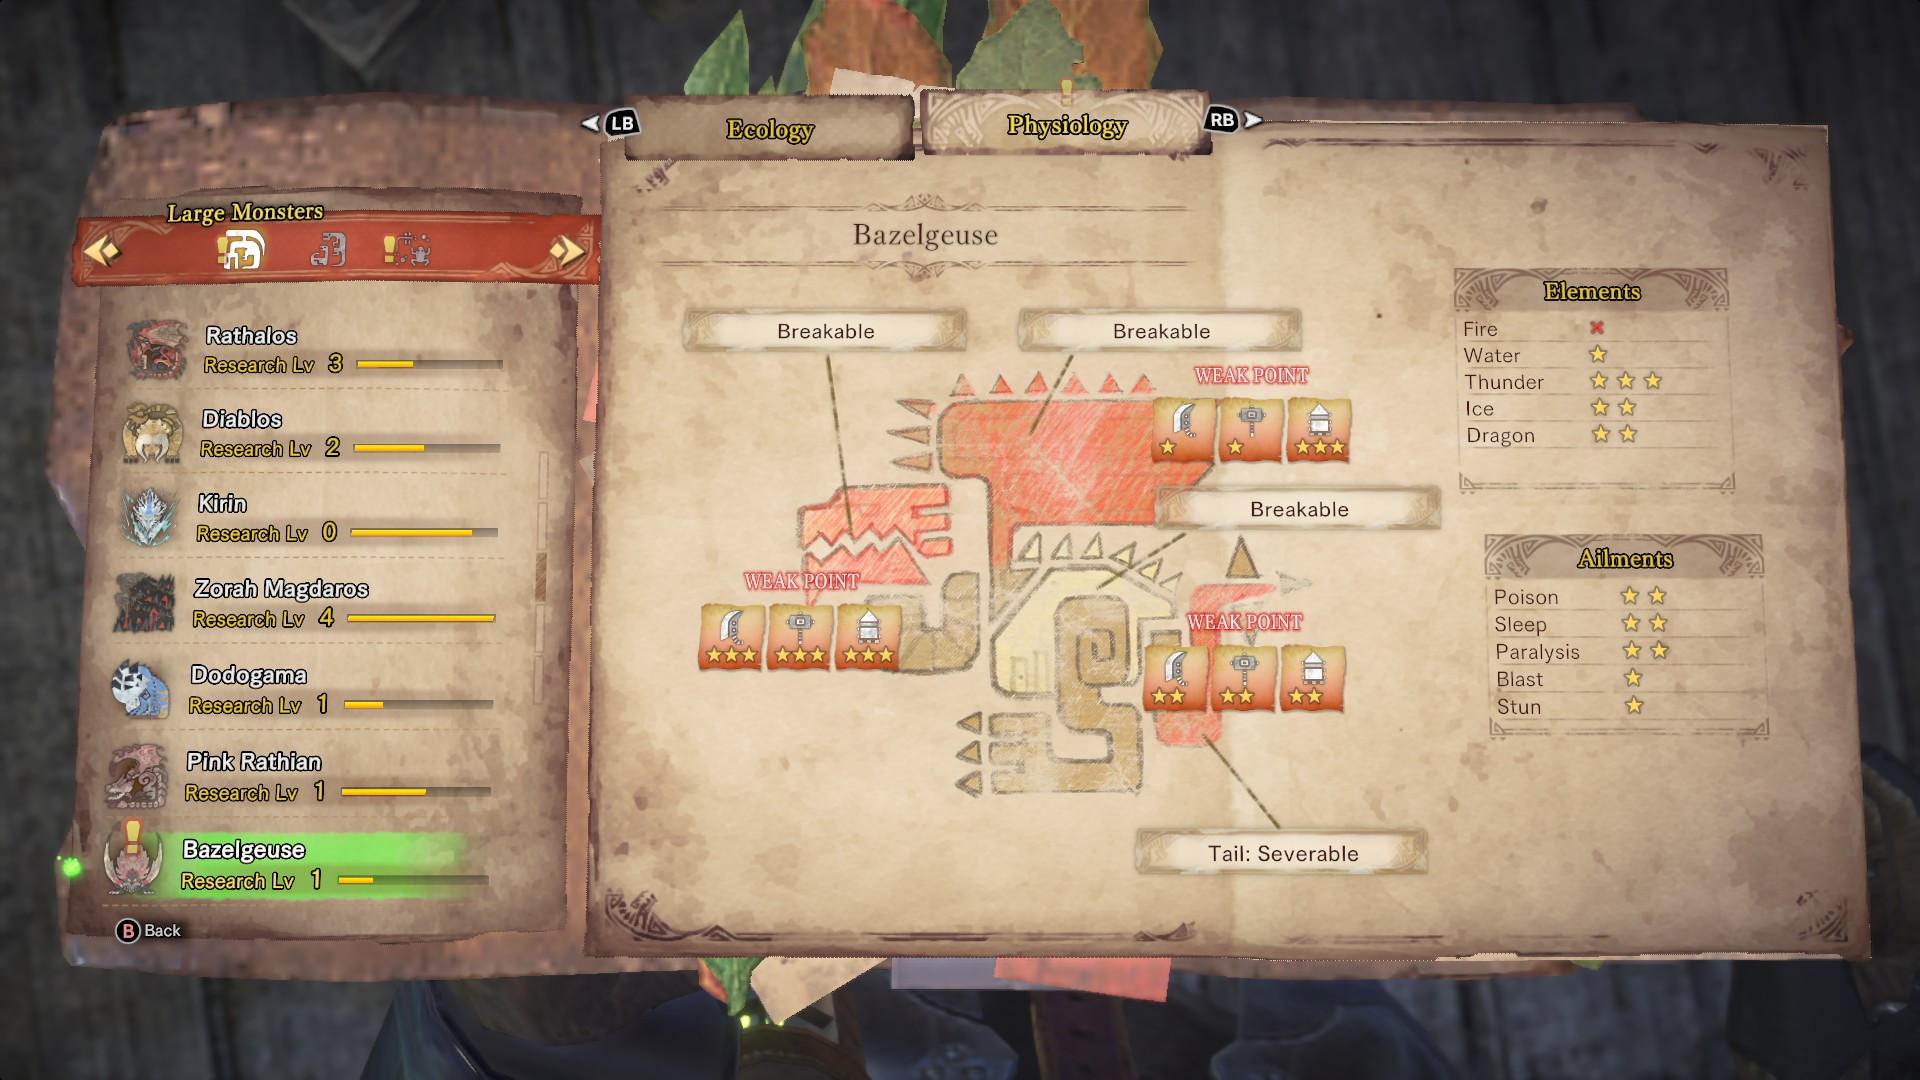
Bazelgeuse strengths and weaknesses
Thunder attacks are the way to go with Bazelgeuse as it's its biggest weakness, while ice and dragon also do respectable damage. Weirdly, for a monster that is resistant to fire, it also isn't hugely affected by water attacks, so make sure you're not using either of these two elements. While blast and stun do little against Bazelgeuse, the other three ailments of poison, sleep, and paralysis all have similar effectiveness.
Its weak points are its head, wings, and tail, of which the head is the biggest weak point for most weapons. This is one fight where you may wish to consider using ranged weapons such as the bowguns or bow, as it has the best ratio of effectiveness compared to melee weapons and keeps you away from its explosive shards. Breakable points include the head, back, and wings, while the tail is also severable, which does limit some of the laying of explosive shards.
How to fight Bazelgeuse
If at all possible, make sure you always have some kind of slinger ammunition on you, especially if you're trying to fight it using melee weapons. Ideally you'll want stones easily accessible. This is so that whenever it lays the mine shards, you can trigger them from a safe distance, negating some of its effectiveness. You'll also want to bring anything that will put it to sleep or paralyse it as this can make some of its attacks a little easier to deal with.
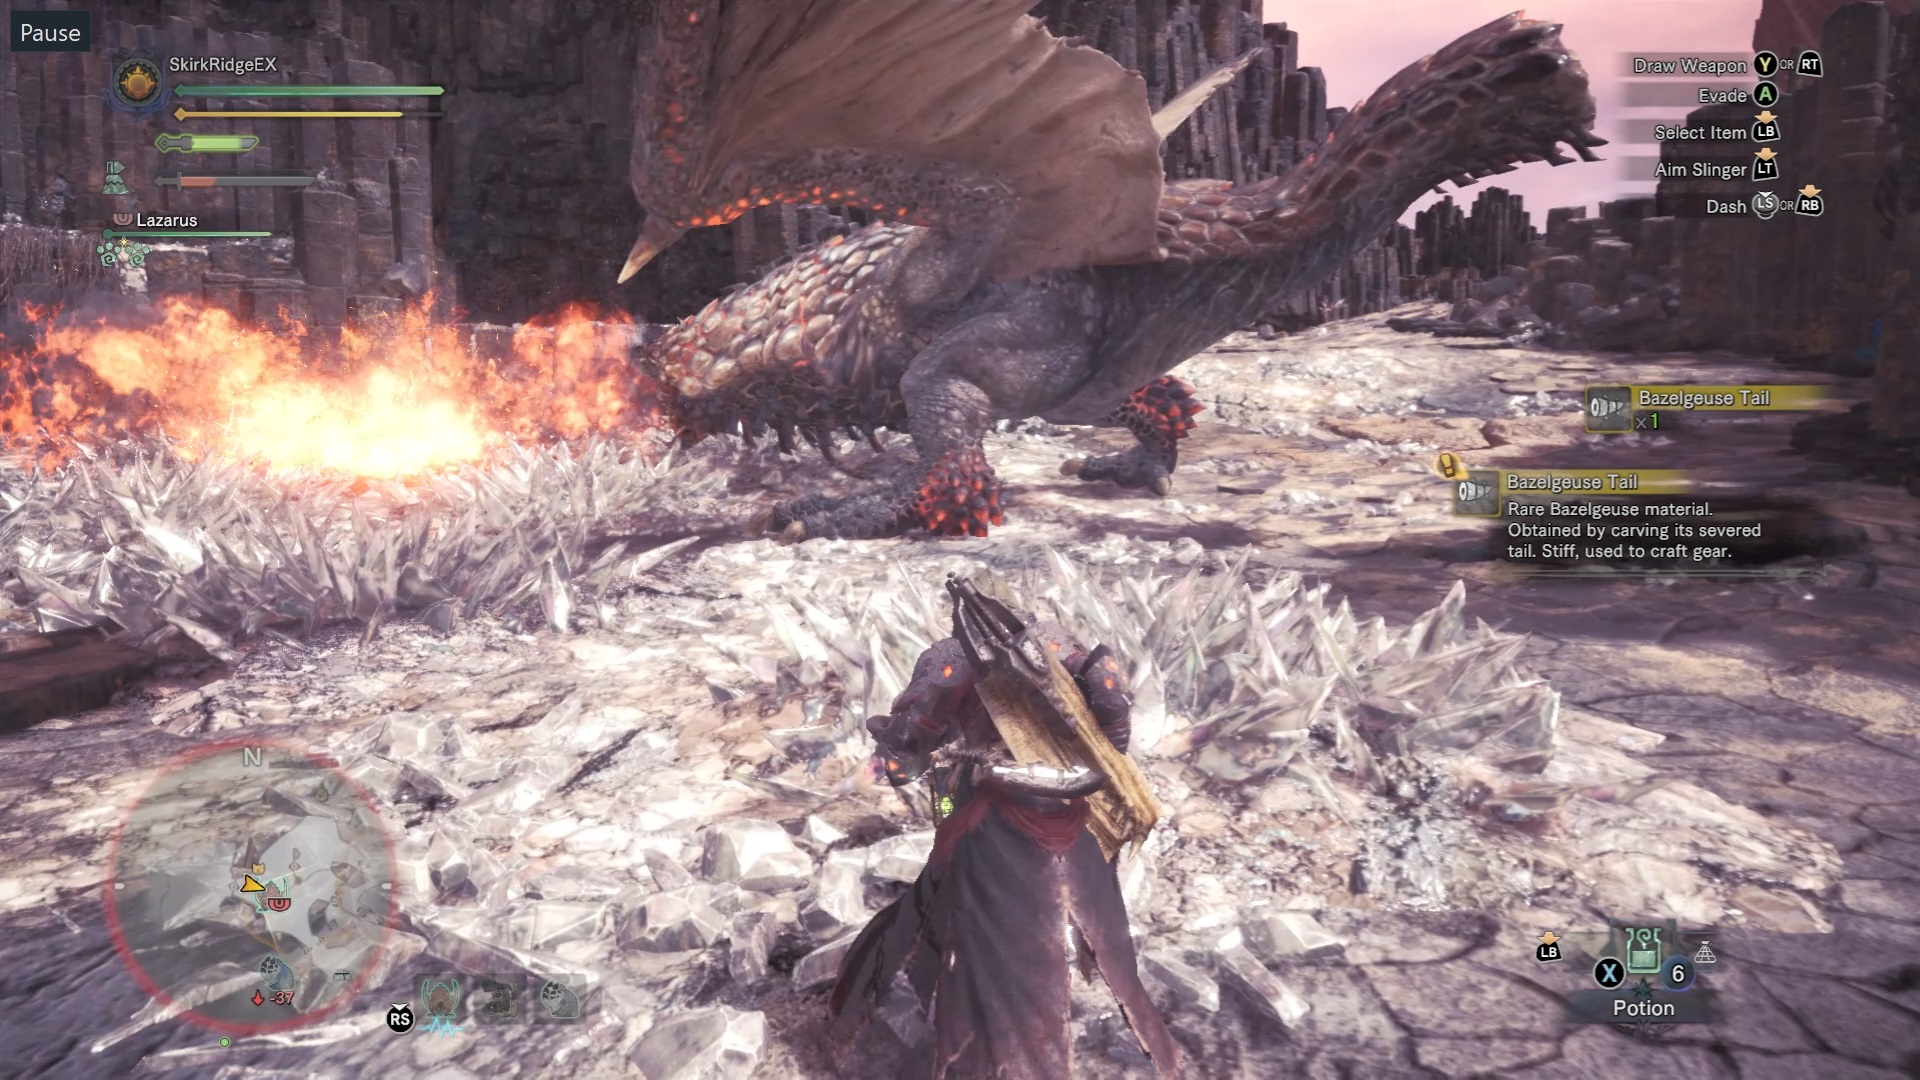
Bazelgeuse has an array of attacks that make it very hard to get in close. When it's on the ground, it can rise up and drop a lot of shards from its chest, before slamming down. The slam will not only hurt if you're hit by it, but it will also detonate the shards, as well as staggering those not hit but very close to it. Just keep far away to avoid this. Its most common attack is to slam its head into the ground, then charge a short distance before rising up and dropping shards. Head to the side of it to avoid this attack and make sure you're behind it to get a decent chance at hitting it. It also has a very rarely used fireball attack that's relatively easy to dodge.
Bazelgeuse is most dangerous when flying and the resistance to stun means you'll likely need to deal with this the hard way. It will make two passes over you, dropping shards as it goes along, before dive bombing your position. Make sure you know where you're dodging to as even if the attack is avoided, a detonating shard may still catch you if you're close enough.
There will come a time where Bazelgeuse will turn red, which will cause the shards to instantly blow up upon hitting the ground. Arguably, this makes it a lot easier to deal with, as you just need to ensure you're not in the vicinity of where it drops the shards, but at the same time there is little reaction time for those moments where it flies overhead. Just keep calm and avoid these attacks when you can.
As a bit of a bruiser, Bazelgeuse will frequently have turf wars and prey on other monsters in the vicinity. This can be advantageous, but Bazelgeuse is the dominant predator of almost all the areas it inhabits, especially in the Elder's Recess where its attacks can also trigger the blastblight that Dodogama can inflict on anyone unfortunate enough to be affected by it.
For those instances where it all gets a bit much, have some dung pods on you to shoo the invaders away. However if Deviljho is also in the area, consider leaving the two to have a scrap before firing that dung pod at "Pickle". They'll deal a huge amount of damage to each other which can make all the difference.
What materials can I get from Bazelgeuse?
It might be unreasonably difficult to deal with, but Bazelgeuse has some incredible equipment you can craft from its materials. Some items are more likely to appear once you've captured this monster, more on that in our Monster Hunter: World capture guide. For more on how to use these items, you can either check out our Monster Hunter: World combat guide or our Monster Hunter: World armour guide. In the list below, the stars indicate the frequency in which the item in question will drop, as well as details on whether some items are obtained by breaking a specific part of the monster.
| Item name | Rarity of materials gained from carving | Combat and carving notes | Rarity of materials gained as rewards | Reward notes |
|---|---|---|---|---|
| Bazelgeuse Scale + | ***** | **** | ||
| Bazelgeuse Carapace | **** | Can be obtained by breaking its back. | **** | |
| Bazelgeuse Talon | *** | Can be dropped. | *** | |
| Bazelgeuse Fuse | *** | Can be obtained by breaking its head. | *** | |
| Bazelgeuse Wing | *** | Can be obtained by breaking its wings. | ** | |
| Bazelgeuse Tail | Obtained by carving its tail. | ** | ||
| Bazelgeuse Gem | * | 2% carve. 3% tail carve. 1% back break | * | 2% capture. 6% Silver reward. 13% Gold reward. |
| Monster Hardbone | N/A | *** |
That's it for our strategies for Bazelgeuse. You should now have a fair bit of equipment that can help against the three Elder Dragons, but those who want a refresher on the previous monster should head to our Monster Hunter: World Azure Rathalos guide. All three Elder Dragons are tough fights, so you can check out our Monster Hunter: World Teostra guide for how to deal with the fiery lion dragon, our Monster Hunter: World Kushala Daora guide for navigating the tornados it creates on a whim, and our Monster Hunter: World Vaal Hazak guide for tips on how to negate the nasty ailment it can inflict on anyone fighting it.