If you want to start an illustrious streaming career, you will likely run into a few streaming and recording applications along the way. So here’s our guide to one of the most popular free apps available, Open Broadcaster Software – more commonly known as OBS Studio
Want to upgrade your processor for some x264 goodness? Here’s our pick of the best CPUs around today.
There are plenty of choices for potential gameplay recording software, such as: Nvidia’s Shadowplay, AMD’s ReLive, Bandicam, XSplit, Fraps… I could go on. For today, we are focusing on OBS.
Why OBS? Well it’s free, open, accessible, and offers tons of utility. You can change almost every setting to get content looking exactly how you like it, while ensuring your hardware doesn’t struggle too much during capture. These in-depth settings can seem a little daunting at first, but it is pretty straightforward to get up and running with the ideal settings and with a little extra effort, understanding the basics to master OBS on the fly.
_________________________________________________
Setup OBS Studio
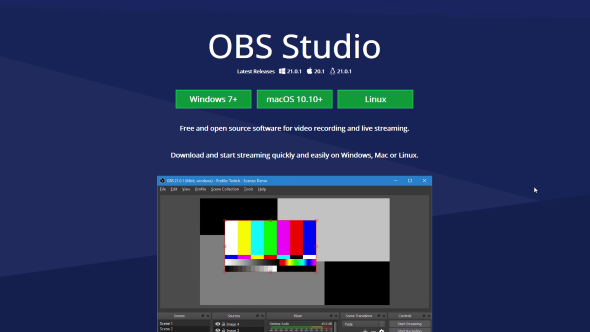
You can head over to OBSproject.com to pick up the necessary installation files direct from the source. Bear in mind that you’ll want to pick up ‘OBS Studio’ and not simply ‘OBS’, as that is an older version. Get OBS Studio downloaded and follow all the usual installation fluff to get it all ready to go.
Once you’ve got OBS Studio installed, open it up and you’ll be greeted by the main interface window. Before we get into what is going on here, it is best to setup some of the most basic options available to you.
1. Head over to Settings in the bottom right or under File.
2. Select the Audio submenu.
3. You can ignore most of the settings within here for now. We just need to setup where OBS will be capturing Desktop audio (everything you here outputted to your speakers or headphones) and Microphone audio. Select Desktop Audio Device and from the dropdown select your primary audio device. Remember this isn’t the output device you may always use, you need to select the device which you’ll be using once you start recording – usually a pair of gaming headphones, for most.
4. Do the same for Mic/Auxiliary Audio Device. Press Apply.
5. Now head to Video.
6. You want to change your Base (Canvas) Resolution to your desired output resolution. This is usually the same as your monitors resolution. If you want to scale this down to reduce the performance impact, then it’s recommended to do so within the Output (Scaled) Resolution dropdown below. Set these to be the same resolution if not.
7. Within Video you can also change your desired fps value. Default is 30, but you can set this to 60 if you prefer. Press Apply. Click OK.
For now, we will leave the rest of the settings alone, but we will need to head back here before we start recording. Here’s what is going on within the main interface:
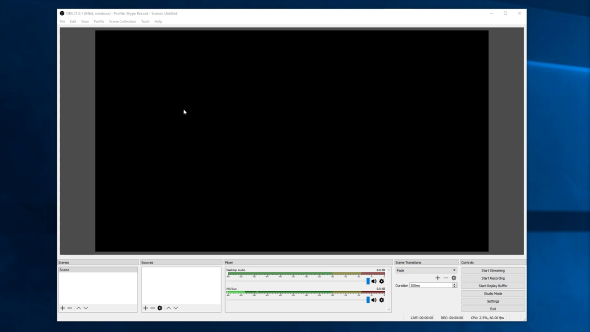
The black rectangle is your canvas for any windows or games you choose to capture. Whichever image within this canvas’ boundaries will be outputted to the final video.
Starting in the bottom left you’ve got your Scenes menu. These essentially let you swap between different image inputs in varying layouts and order. You’ll want to use these if you plan on capturing multiple inputs and changing between them throughout your recording or stream. If you want to simply capture a game and nothing else, you can forget about these for the most part.
To the right of Scenes, you have Sources. These are actual input sources that you will be capturing, such as display capture, game capture, or webcam capture. These are the settings which tell OBS what to actually record. You can use multiple sources within a single scene, and you can use the same source across multiple scenes, as well.
Further to the right of Sources is your Mixer. This will usually feature your Desktop Audio, and if you have one connected, your Microphone Audio too. If you followed the above steps, any sounds coming through your headphones should now be affecting the Desktop Audio sound levels.
You can always play some music to ensure all is working correctly, go ahead and test your microphone here now as well. If you find these volumes are heading into the red or yellow areas too often, you can drag the volume slider just below the levels to lower the volume of that input. This is also useful to balance the sound of your game and microphone so you don’t wash one or the other out.
Next to Mixer are the Scene Transitions. These will be explained a bit later regarding Studio Mode, but essentially they allow you some control how transitions play out to keep your stream or video looking professional. Streamers may find these useful, but for recording you might not use them too often.
Last but not least on the bottom right are the most important controls. The most important settings are Start Streaming and Start Recording. Which will pretty much do what it says on the tin. Studio Mode is a very useful tool for transitioning however we will cover this a little later once we’ve covered the basics.
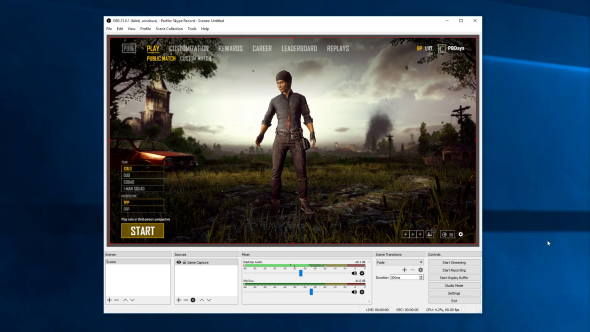
Let’s say you want to capture PUBG, here’s an example of how to set this up before you start:
1. Check your Sources box is currently empty. If it’s not, then select the remaining source(s) and click the minus symbol.
2. Click the plus symbol.
3. Select your input type. For this example, we will select Game Capture.
4. The Create/Select Source menu will pop up. You can rename your source to be whatever will be most identifiable to you, but for this example, we will simply leave it as Game Capture. Press OK.
5. The Properties window should now appear. The Mode is how OBS will select the correct application. For the most part games will be the only fullscreen apps you will likely have running, so you can leave this setting as Capture any fullscreen application if that suits you. Just bear in mind you’ll need to ensure any games are, in fact, running in fullscreen mode to be spotted by OBS. Otherwise, you can select Capture specific window. This allows you to pick any open window you have running. You’ll need to start the game and then ALT + TAB to return to OBS to select it, but this will ensure the game is definitely the window targeted for capture. Press OK.
6. Your chosen source should now appear across the black canvas. You may need to resize this window to fit. To do so, you can either drag the red border as you like, or right click within the red border, hover over Transform, and select Fit to screen. If you followed the basic settings setup earlier, you likely won’t have to change a thing.
7. Wait! You still aren’t ready to record just yet. We need to ensure you have the best quality and encoding settings all ready to go before we go any further. This is a little more complex that the first few steps, but settings like this are what make OBS such a powerful tool.
As we mentioned beforehand, you always layer up sources within a single scene. This allows you to capture a webcam in the top right corner and a game below, or whatever combo you fancy. Whichever source is on top of the list will be on top of the final video composition.
So you’ve got the basic setup down. There are a few more things you need to master to really ensure you are getting the most out of your hardware and the best quality result when everything is said and done. To do this we need to head back into the menus and change which piece of hardware is encoding our recording or stream.
_________________________________________________
Optimise OBS Studio for recording
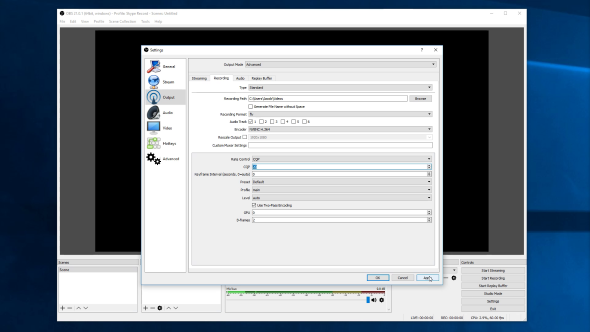
For now, let’s focus on getting everything setup for recording.
1. Head into Settings, and then into Output.
2. The first setting allows you to swap between Simple and Advanced modes. For now we will head to Advanced as it offers some useful options to really fine tune your setup, but it’s still pretty easy to navigate.
3. So skipping streaming for now, look toward the recording section. The recording path is where you will output the finished video file once you’ve finished capturing footage. If you are gaming on a hard drive, you may find that your video comes out laggy, choppy, and incredibly low quality – this is because it can often be too demanding to read and write both gaming and recording to the same drive. Change this to another drive to solve this issue. If this is set to an SSD, you should be all good.
4. So Recording Format is where things get a little more interesting. The most popular options and their benefits and weaknesses are the below table.
5. If audio isn’t an issue for you, or you are only recording one source, then stick with .FLV. Otherwise, .MKV may be the best option for you, just be wary of the extra remux step required. You’ll need to tick the audio tracks that you require within the settings here. These are then editable within the Mixer.
6. Encoder is one of the important steps. What is available to you on this dropdown list will all depend on whether you are using Nvidia, AMD, or Intel hardware. You can always utilise your CPU and the x264 format (professional streamers will often do this to ensure the best quality, but it’s not required), but you are best off selecting your graphics card-specific encoder for recording. CPU x264 encoding can also be quite demanding, which is often why professional streamers utilise powerful CPUs and separate streaming systems.
Nvidia = NVENC
AMD = H264 Encoder (AMD Advanced Media Framework)
7. Once you’ve selected your encoder, new settings will appear. Within here you need to change the Rate Control settings. Let’s change these to CRF/CQP. Without going into too much detail, 23 is default and the higher this number up to 51, the worse the video quality will be. Thelower the setting (zero being lossless), thebetter your video will look.
You may want to check out the Replay Buffer tab, too. This setting, once enabled, will capture a predetermined replay time, that is gradually overwritten, but can be saved at any point with a hotkey to capture the last five minutes or so (depends on your setting for the length of time). This is useful for capturing the highlights of a game, rather than consistently recording and wasting space and time when editing. You need to set the length of time you’d like to capture (measured in seconds), and don’t forget a save replay buffer hotkey in the Hotkeys submenu to save the last five minutes or so. Make sure to test this out before you give it a go in-game!
That’s pretty much it for recording. Once you’ve got all your sources setup and changed all your settings, you are ready to press Start Recording. Test this out and check your output folder to ensure everything has gone smoothly. Don’t forget you can up the quality in within Output if need be!
_________________________________________________
Optimise OBS Studio for streaming
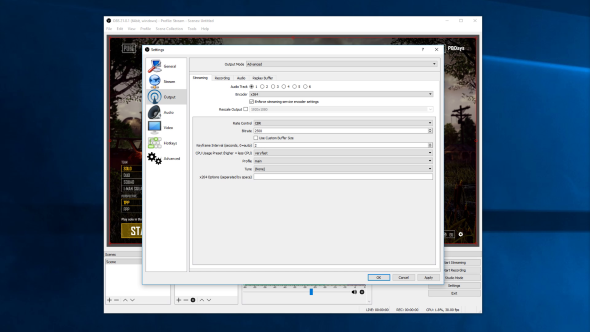
So now we’re onto streaming. While during recording we were focused on ensuring high quality, for streaming it’s best to ensure the best quality to bitrate ratio your PC and connection can handle, while also maintaining consistent quality for your viewers. This can be a little trickier than setting up recording, but it’s nothing to we can’t handle.
Before you do anything, if you want to record your stream at the same time, then head to Settings, then General and tick the box Automatically record when streaming. You also might want to utilise the Profiles tab within the main interface. By creating a profile for streaming and one for recording, you won’t have to keep changing all your settings every time.
The larger the resolution and higher the framerates, the higher your bitrate will be required to be. The popular streaming platform, Twitch, outlines the full requirements required for every tier very well, but I’ll sum up resolution and fps vs bitrate here for reference:
1. In OBS you need to head over to Settings and then Output.
2. Within the Advanced settings, click to the streaming tab and look for the bitrate options. We are going to leave this on CBR, which stands for Constant Bitrate. Depending on your internet connection and hardware, you will want to take a look at Twitch’s recommended bitrates and set yours accordingly. This may be somewhat trial and error, but a necessary step to smooth streaming. Twitch used to limit bitrate to 3500kbps, but they’ve since ditched the limit. Still, it’s worth testing at this quality, or less preferably, initially and seeing how this looks to you.
3. Try to do everything you can to ensure a smooth internet connection, also. Using ethernet cables rather than wireless will be much more consistent, for example. Make sure to change your resolution and fps within the Video options while testing, also. Tip: A smooth stream looks much nicer than a high resolution one that is choppy.
4. Try out utilising your CPU first, so set your encoder to x264. Offloading all this encoding work onto your CPU can sometimes lead to better results. If this doesn’t work as well as you’d like, or your CPU isn’t quite up to spec, you can always have your graphics card to do all the heavy lifting by changing your Encoder to the same as the one you set for recording.
5. Set your keyframe interval to the Twitch setting outlined above, for the most part this is also set to 2 seconds. Otherwise, check the recommended settings for your preferred platform.
6. For the most part, the ‘veryfast’ CPU usage setting will be the best balance for most use cases, however you can tweak this if desired. This is where the benefits of a CPU can show, however it all depends on how well your CPU can handle potentially slower usage presets, but they will improve quality as you drop down to the slowest setting.
7. Set your AVC h.264 profile and level to the Twitch recommended settings above for your preferred settings. Similarly, check your preferred platform for the recommended setting.
8. Audio is set to the default, and will likely be high enough for solid audio quality while streaming, but you can always change it here if need be.
9. Click Apply.
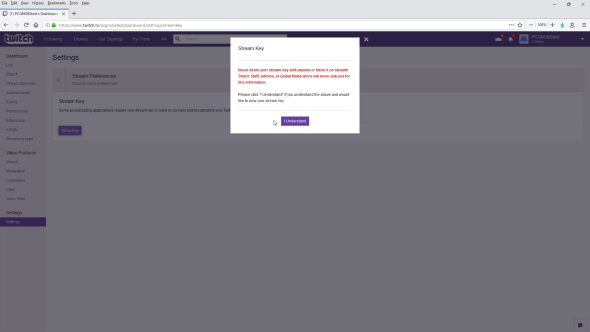
Before you can start streaming, you also need to ensure that OBS is streaming to your account and followers, otherwise you will just be talking into the infinite abyss. To do this, you need to get hold of your Stream Key from Twitch (or whichever platform you prefer, instructions may vary). For Twitch, however, you can find this in within your dashboard on their site.
1. Copy this key from Twitch and then head over to Settings and Stream.
2. For the most part, leave the default settings and copy your key into the Stream Key box. Click Apply. You can always change your preferred service from the service dropdown, and also the server. You can check which server is best for you using various webtools, which is likely the one geographically closest to you. For now, let’s leave it on Auto.
3. Click Apply
That’s it. You have the basics of streaming covered. Now you can head onto Twitch, set up a broadcast, and then return to OBS and click Start Streaming. Just remember to turn off that stream when you are done, okay?
_________________________________________________
Streaming tips, tricks, and tools
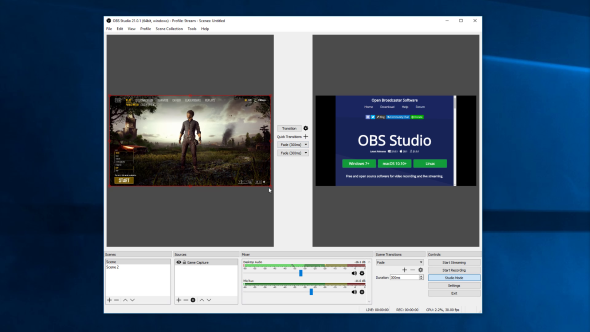
Studio mode is useful for preparing and transitioning between scenes and editing scenes before changing over to them. Once activated, the left hand panel is your editable preview capture, and the right hand panel is the live recording/streaming panel. This allows you to change or edit the preview screen and then transition that into your live capture without making those changes live on stream or within a recording.
1. Just select the scene in the bottom left once Studio Mode is activated to preview on the left hand panel.
2. Edit to your liking.
3. Press transition to put your selected scene live within the right hand panel.
Another useful built-in OBS tool is the stream delay feature. THis allows you to delay your stream from outputting immediately, so should you accidentally reveal some sensitive information, you can prevent it from ending up on the web. Be wary of the amount of memory that this will require, just in case it causes any issues later on.
To activate:
1. Head into settings, then advanced
2. Tick the enable checkbox under stream delay.
3. Set your delay duration, and take note of the memory usage.
4. Click Apply and OK.
NewTek NDI is a useful standard for users who prefer to set up an independent streaming rig separate from their main gaming machine without the use of a capture card. This free standard allows for video inputs and outputs to be transferred across a network and thankfully makes this setup very easy to implement on OBS. You can download an OBS NDI plugin straight from OBSproject that will allow you to set this up across devices with little to no hassle.
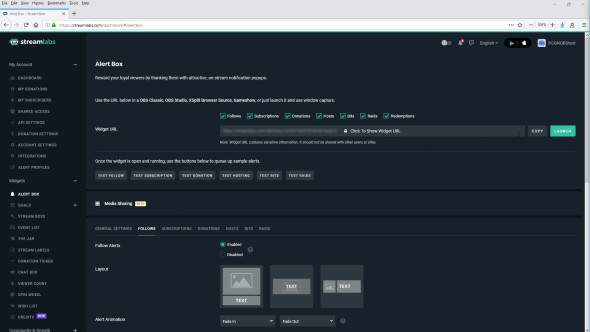
StreamLabs is one of many streaming alert services, but it’s very popular so we will cover that for today. This allows you to set up alerts and responsive widgets straight onto your stream, and it’s entirely free. To do this, you need to setup an account over at Streamlabs, and link your streaming platform account, such as Twitch. You can then customise how you would like these widgets to look through the site.
To put these stream widgets straight into OBS:
1. Grab the widget URL from the Streamlabs widget page once you’ve setup how you’d like it to look through your account.
2. Now head over to OBS, and right click within Sources and hover over add, or click the plus symbol within the box. From here, navigate to and select BrowserSource.
3. Within the Create/Select Source window, you can change your source name to reflect the widget being installed. For example, change this to Alerts. Press OK.
4. Within the properties window, select URL, delete any URL currently in the box and paste in your widget URL. You can edit where this widget looks within this page, but you can also move it around by selecting it from the main interface too. Press OK.
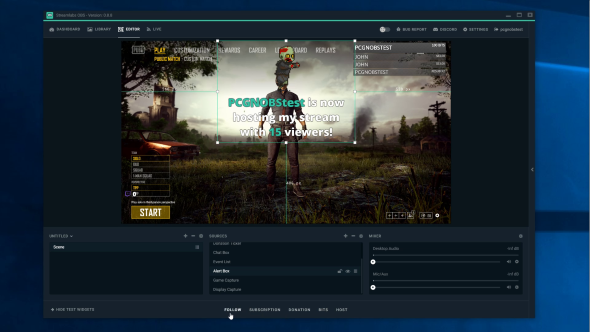
If you are looking for something a little more integrated for streaming, you can also try out Streamlabs OBS. This brings all the features that many users find useful from the Streamlabs platform, but straight onto the solid open-source foundations of OBS. Plenty of the same basic principles carry over from OBS to Streamlabs OBS (or SLOBS as it is affectionately known as), so you everything you’ve learnt above still mostly applies.
SLOBS is your one-stop-shop for streaming. You can integrate your chat, find your perfect streaming settings for connection and encoder, setup your broadcast, access your dashboard, and setup your overlays all within one app. Currently the app is in Beta, but it’s worth checking out (it’s free!) to see if you prefer the all-in-one approach.
You can always still use the Streamlabs widgets through streaming platform (such as Twitch or Youtube) directly and keep your OBS separate, which may be useful as the OBS Studio and SLOBS platforms could end up supporting different setups or configurations down the line.
Get even more information on Twitch channels, growth, emotes, followers, stats, and more to help you grow your channel and plan your rise to streaming stardom over at our sister-site Twitch Tools.
